


A subscription product in WooCommerce gives a repeat purchase a price and billing schedule. This guide covers the Swift Commerce product setup and the payment, email and account checks to run before selling it.
In this guide, we will create a $29-per-month subscription product using Swift Commerce’s Subscriptions feature. We will cover the product settings, customer account, emails, and payment checks you need before accepting real subscriptions. Creating the basic recurring product is available in Swift Commerce Free.
One important distinction: creating a subscription schedule does not automatically make every payment gateway capable of charging a saved payment method. We will check that separately.
Before creating a subscription product in WooCommerce
- Install and activate WooCommerce and Swift Commerce. You can install Swift Commerce from Plugins → Add New Plugin by searching for its name.
- Have your WooCommerce cart, checkout, and My Account pages set up.
- Choose what the customer receives, how often they are billed, and whether the subscription has an end date.
- Have a staging site and your gateway’s sandbox or test mode ready. Do not use a real customer’s payment details to test renewals.
These instructions use the WooCommerce product editor with the Product data panel. For help with the standard product fields, WooCommerce’s product management documentation is a useful reference.
For the walkthrough, we will use a monthly stationery refill box. It costs $29 each month and has no sign-up fee. The amount is an example, so use the price and currency that apply to your store.
1. Enable Subscriptions
- Open Swift Commerce in your WordPress dashboard.
- Go to Products → Subscriptions.
- Turn on the feature using the switch in the page header.
- Click Save Changes.
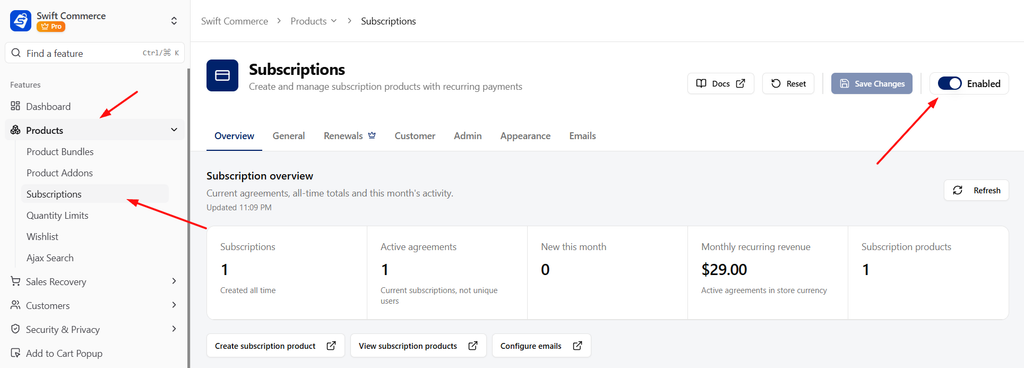
If the feature is already enabled, leave it on. You do not need to change the renewal or advanced settings just to create your first product.
2. Add a new WooCommerce product
- Go to Products → Add New.
- Enter a product name, such as Monthly Stationery Refill Box.
- Add a product image and describe what is included in each delivery.
- In the short description, explain the recurring price and delivery schedule. For example: “A stationery refill box delivered each month. $29 per month, plus any applicable shipping and tax.”
- Save the product as a draft while you configure it.
Be specific about the contents and frequency. “Monthly subscription” is not enough if the customer cannot tell what they will receive.
3. Choose the Subscription product type
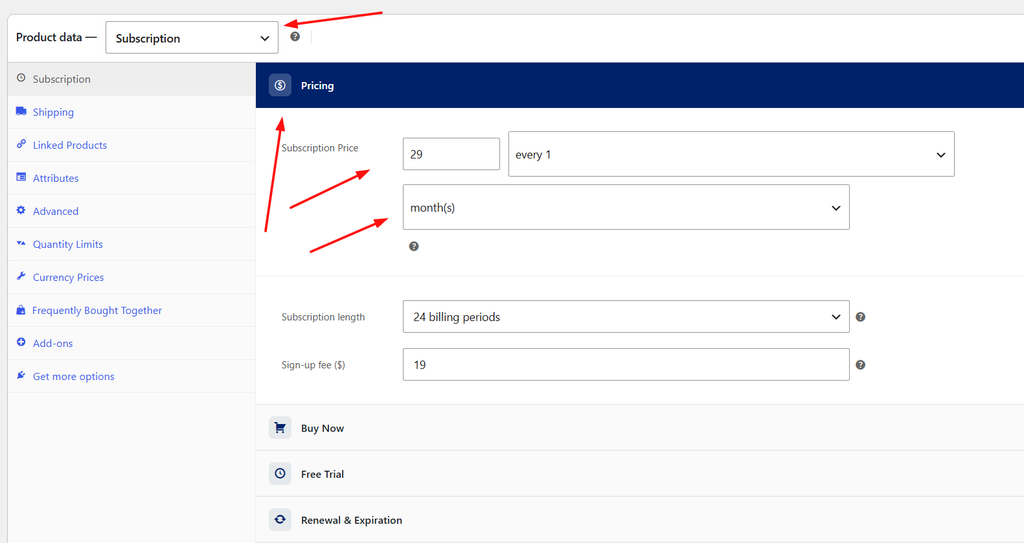
- Scroll to Product data.
- Open the product-type dropdown, which normally starts as Simple product.
- Select Subscription.
- Open the Subscription tab in the Product data panel.
- Expand Pricing if it is collapsed.
Use Subscription for this single recurring offer. The separate Variable Subscription type is for offering a choice of subscription plans; you do not need it for one monthly price.
If Subscription is not in the dropdown, check that WooCommerce and Swift Commerce are active, and that the Subscriptions feature is enabled and saved. Then reload the product editor.
4. Set the recurring price and billing schedule
In the Pricing section, set up the monthly example like this:
| Setting | Value for this example |
|---|---|
| Subscription Price | 29 |
| Interval selector beside the price | every 1 |
| Period selector | month(s) |
| Subscription length | Never expires |
| Sign-up fee | 0, or leave empty for no sign-up fee |
Enter the price as a number without a currency symbol. The store’s currency setting determines how it is displayed.
Together, every 1 and month(s) mean once each month. If the product should renew every three months, choose every 3 and month(s). Enter the amount due at each billing date, not a monthly equivalent: a $75 charge every three months should use a price of 75.
Never expires means there is no fixed end date configured on the product. The subscription can still end through cancellation or another status change. If you sell a fixed-length subscription, choose the appropriate length and check the resulting dates during testing.
A sign-up fee is an additional one-time amount at the start. Leave it at zero for this example so the first purchase is straightforward. Free trials and more advanced renewal settings are Pro options, not requirements for creating the product.
5. Finish the normal WooCommerce product details
A subscription still needs the same basic product information as other items in your store.
- For a physical box, complete the relevant shipping details, stock settings, and tax settings. Confirm what shipping costs the customer will see.
- For a service that does not require shipping, use the Virtual checkbox where appropriate.
- Add a category, product image, and clear description.
- Explain the billing frequency, what is included, cancellation arrangements, and any extra charges before the customer buys.
A recurring payment schedule does not itself provide membership access, appointments, or a fulfillment service. If your offer depends on another system, confirm how you will provide that part of the purchase.
Save the draft. Keep the product unpublished until you have checked the storefront and the payment flow.
6. Set the customer account and checkout behavior
Subscription purchases require a customer account so the subscription can be linked to its owner. Test both an existing customer and someone placing their first order.
Under Swift Commerce → Products → Subscriptions → General, review:
- Mixed Checkout: controls whether a customer can buy subscription and non-subscription products in the same cart.
- Allow Quantity Selection: controls whether subscription products show a quantity field. Leave it off for one refill-box subscription per purchase.
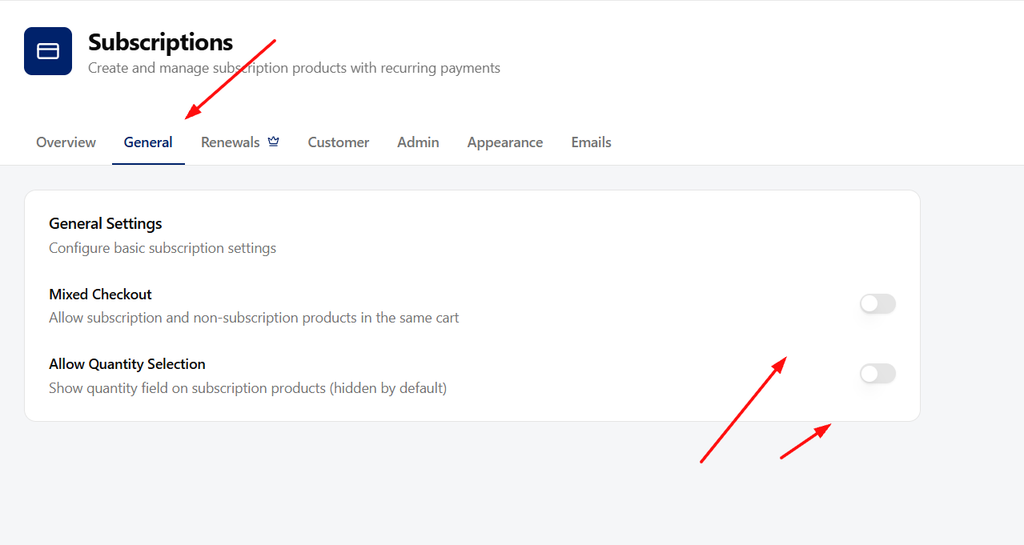
If you change these settings, click Save Changes. Then open the Customer tab and review Allow Subscription Pause and Allow Subscription Cancellation. Enable the actions you intend to offer and save your changes.
When pause is allowed, Maximum Suspensions controls how many times the customer can pause. The interface uses 0 for unlimited. Choose a policy that matches how you actually fulfill the subscription.
Make sure the store’s My account page is assigned under WooCommerce → Settings → Advanced. WooCommerce explains the page assignments in its Advanced settings documentation.
7. Check how renewal payments will be collected
Do this before you describe the offer as automatically renewing.
- Identify the payment gateway and gateway plugin you plan to use.
- Confirm that the exact gateway integration supports automatic renewal payments with Swift Commerce. Support for a normal WooCommerce checkout payment alone is not enough.
- Use the gateway’s test mode to complete the initial payment.
- Test a scheduled renewal and check the gateway result, renewal order, and subscription status. A successful first payment does not prove later automatic charges will work.
- If the integration requires manual renewal, check the customer’s payment route and explain that payment process clearly.
Offline methods such as bank transfer or cash on delivery do not become automatic card charges just because the product has a monthly schedule. If you are unsure about a gateway, confirm support before accepting live subscriptions.
Renewals also depend on the site’s scheduled background work running correctly. If a renewal does not run when expected, check the site’s scheduled tasks and payment logs rather than repeatedly placing new live orders.
8. Review and customize the subscription emails
- Return to Swift Commerce → Products → Subscriptions.
- Open Emails.
- Review the New Subscription and Subscription Activated notifications.
- Click Customize beside an email to open the built-in Email Customizer.
- Review the subject, email content, branding, and desktop and mobile previews. Save the customizer changes and any remaining settings changes.
Both of those notifications are available in Free. Pro adds notifications for other subscription events, including cancellations, expirations, on-hold subscriptions, renewal reminders, trials ending, and payment failures. The Email Customizer lets you edit the supported emails without building a separate email template from scratch.
Make sure the wording matches your payment flow. A manual-renewal customer should not receive copy promising that a payment will be collected automatically. Also check actual delivery to your test inbox; a preview is not a delivery test.
9. Test the product from purchase to My Account
On a staging site, make the test product available to your test customer and run through this checklist:
- The product page clearly shows the recurring amount and billing period.
- The cart and checkout show the expected initial total, including any shipping, tax, or sign-up fee.
- A new customer can create an account and complete checkout using a test payment method.
- The order is linked to a subscription in the Swift Commerce dashboard.
- The subscription status and next payment date match the order and payment result.
- The customer can open My Account → Subscriptions and view the subscription.
- Pause and cancellation actions appear only as intended by your settings and are tested with a test subscription.
- The relevant emails arrive and show the correct product and subscription details.
- A scheduled test renewal follows the expected automatic or manual payment flow.
Do not treat a pending-payment order as an active, paid subscription. Check the payment result and subscription status before you consider the setup complete.
Once the full flow works, move the verified settings to the live store, check that the live gateway credentials are correct, and publish the product. Keep live and test credentials separate.
Frequently asked questions
Do I need Swift Commerce Pro to create a subscription product?
No. Basic subscription products, recurring prices, billing schedules, and the two initial customer email notifications are available in Free. Pro adds advanced options such as free trials, additional renewal controls, and more lifecycle emails.
Can I offer monthly and yearly plans?
Yes. Use the Variable Subscription product type when you want customers to choose between plans. Each plan needs its own price and schedule. That is a separate setup from the single monthly subscription in this tutorial.
Will changing an existing product to Subscription convert past orders?
Do not treat a product-type change as a migration of past purchases. For a new subscription offer, create a new product and test it. Customers who bought the previous one-time product have not automatically agreed to a recurring purchase.
Why is the quantity field missing?
Subscription products are sold individually by default. Enable Allow Quantity Selection under the feature’s General tab if your offer should allow more than one unit, then test the resulting initial and recurring totals. For minimums, maximums, and pack-size steps, follow our product quantity limits guide and test your subscription setup.
For the full product and settings reference, use the Subscriptions documentation. Start with a simple price and schedule, verify a renewal, and only then add more advanced options.
Once the basic subscription works, follow the Pro free-trial setup if your offer needs a trial. The Subscriptions settings reference explains the controls; the Email Customizer overview explains shared email branding.