


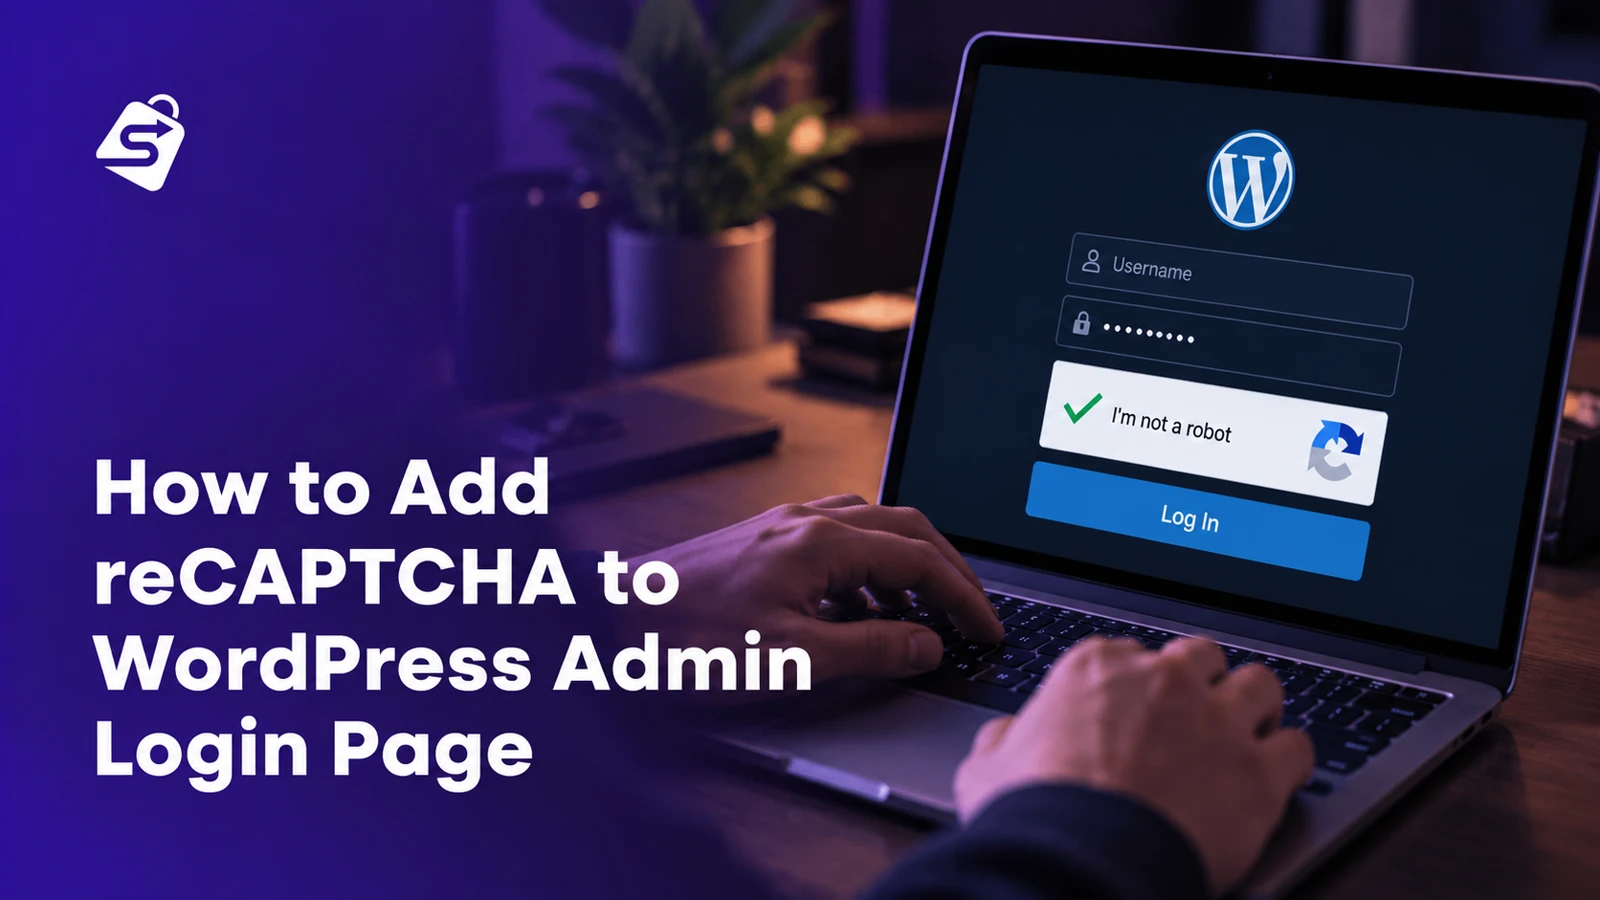
You can add reCAPTCHA to WordPress admin login with Swift Commerce Free. This guide covers the Google keys, login-form setting and testing steps so you can check the customer experience before saving the setup.
In this guide, we’ll add Google’s “I’m not a robot” checkbox to the WordPress admin login page using Swift Commerce. You can do this with the Free plugin, without editing your theme or writing code.
We’ll use reCAPTCHA v2 so you can see the checkbox and check that it appears on your login form. This protects the standard wp-login.php page, which can be used by administrators and other WordPress users. It doesn’t add a CAPTCHA to every screen inside your dashboard.
Before you add reCAPTCHA to WordPress
- Make sure you can access your WordPress admin dashboard and install plugins.
- Have a Google account ready to create your reCAPTCHA keys.
- Know the domain you’re protecting, such as
example.com. - Keep your current admin session open until you’ve tested the login page in a private window.
That last point matters. If a key is wrong, you want to be able to return to the settings and fix it without first having to log in again. It’s also worth knowing how to reach your hosting support in case you lose access.
Already using another CAPTCHA plugin on this login form? Don’t run two CAPTCHA integrations on the same form. Plan to use one, then test it before ending your admin session.
1. Install and activate Swift Commerce
If Swift Commerce is already active, skip to the next step.
- In WordPress, go to Plugins → Add New Plugin.
- Search for Swift Commerce. You can check the plugin against the official WordPress.org listing.
- Click Install Now, then Activate.
Open Swift Commerce → Security & Privacy → reCAPTCHA. You’ll see the reCAPTCHA settings, including the Setup and Protection tabs. You don’t need to enable the suite’s other features for this walkthrough.
2. Create your Google reCAPTCHA v2 keys
Swift Commerce needs a site key and a secret key from Google. They must belong to the same reCAPTCHA configuration and match the version you select in the plugin.
- Open the Google reCAPTCHA registration page and sign in.
- Add a label you can recognize later, such as My Store Login.
- Choose Challenge (v2), then the “I’m not a robot” Checkbox option.
- Add your website’s domain. Enter
example.com, nothttps://example.com/wp-login.php. Use your own domain here. - Select or create a Google Cloud project if requested, review the terms, and submit the form.
- Copy the Site Key and Secret Key for this configuration. Keep the secret key private.
Google’s interface can differ between accounts. Its website key setup guide covers the current creation flow.
If Google opens the Cloud console instead
In Google Cloud, open Fraud Defense → Keys. Create a Web key, add your domain with domain verification enabled, and choose the checkbox challenge. The key should be listed as Website • checkbox or Website • Checkbox challenge, which means v2 Checkbox.
The Key ID is your site key. To get the secret, open the key’s details, go to Integration, and choose Use legacy key or Integrate with a third-party service or plugin, depending on what Google shows. Copy the secret securely.
These are the two values Swift Commerce needs. Don’t paste a Google Cloud API key into the Secret Key field. Google’s key terminology guide explains the labels and where to find the legacy secret.
Testing on staging or a local site? Make sure that hostname is allowed for your test key too. Use separate test and production keys where possible, and keep domain validation enabled. Google’s domain validation instructions explain how domains and local testing are handled.
3. Connect the keys in Swift Commerce
Return to Swift Commerce → Security & Privacy → reCAPTCHA and open the Setup tab.
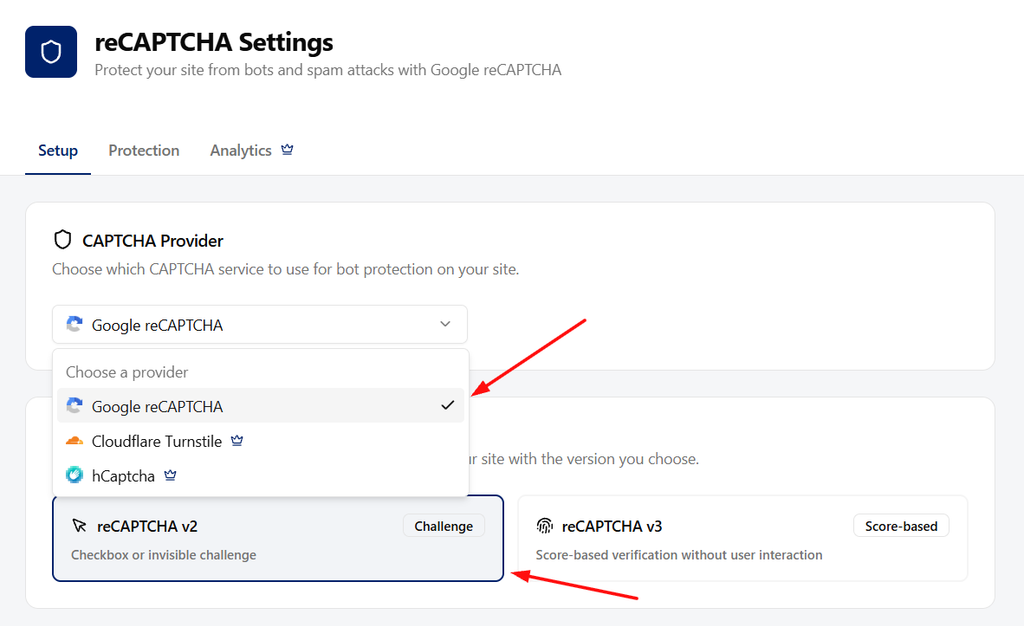
- Under CAPTCHA Provider, select Google reCAPTCHA.
- Under reCAPTCHA Version, select reCAPTCHA v2.
Next, scroll to API Keys. Paste Google’s site key into Site Key and its matching secret into Secret Key. Under Challenge Type, select I’m not a robot.
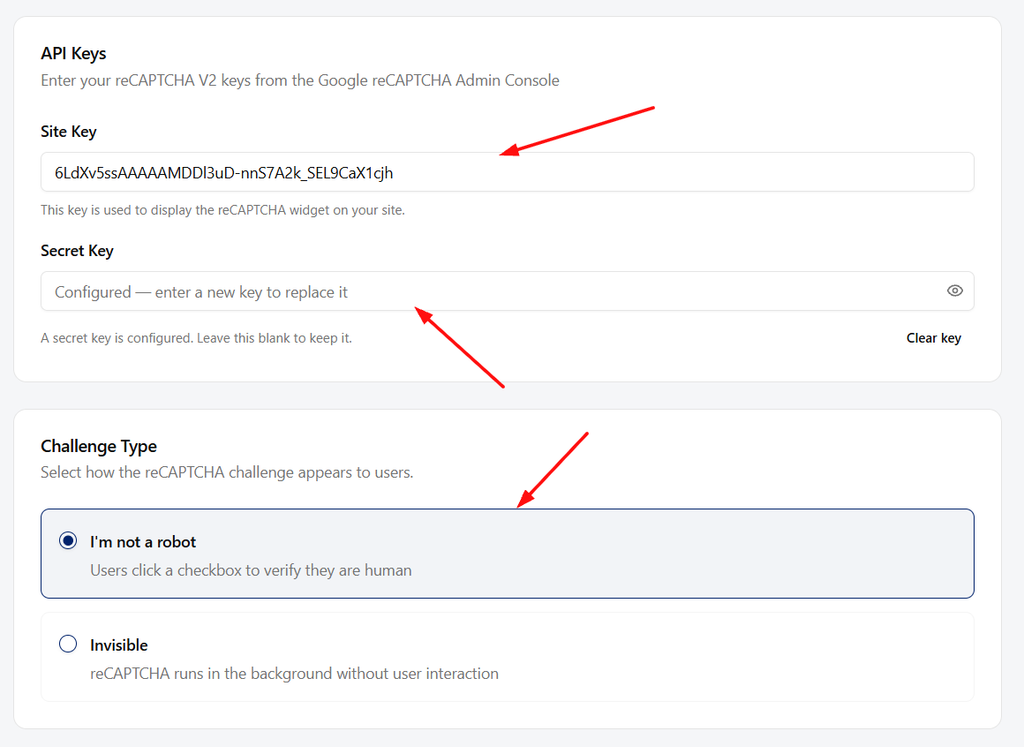
If you’re editing an existing setup, you may see “A secret key is configured. Leave this blank to keep it.” That means a secret has already been saved. You only need to enter a new one if you’re replacing it.
Don’t mix a v3 key with v2 settings. Also, a v2 Invisible key isn’t the same as a v2 Checkbox key. For this tutorial, keep both Google and Swift Commerce set to the checkbox version.
4. Enable protection for WordPress Login
- Open the Protection tab.
- Under Protected forms, select WordPress Login. Its description refers to the admin login page,
wp-login.php. - Make sure the reCAPTCHA feature is Enabled using the switch in the page header.
- Click Save Changes.
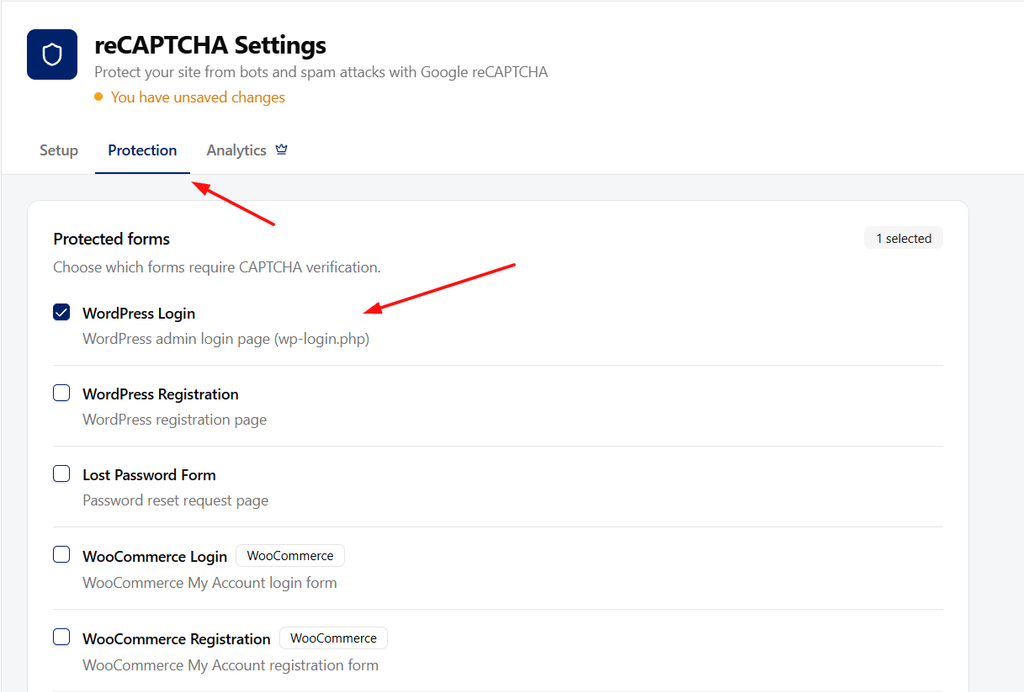
WordPress Login and WooCommerce Login are different settings. WordPress Login covers the standard WordPress login form. WooCommerce Login covers the customer login form on My Account. Select that separately if you want to protect it as well.
You can also choose registration and password reset forms, but they aren’t required to add reCAPTCHA to the admin login page. Leave existing form selections in place unless you intend to change their protection.
5. Test your login page in a private window
Keep your original dashboard window open. In a separate Incognito or private window:
- Open your site’s login page, normally
https://example.com/wp-login.php. Replace the example domain with yours. - Check that the “I’m not a robot” widget appears on the form.
- Enter your own username and password, complete reCAPTCHA, and click Log In. Google may ask you to complete an image challenge too.
- Confirm that you reach your dashboard without a CAPTCHA error.
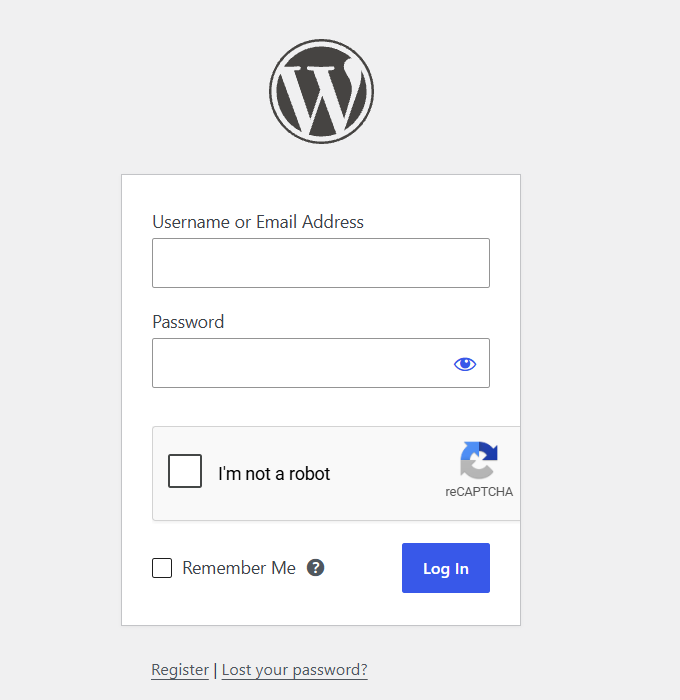
For a further check, open a fresh private session and submit your login without completing reCAPTCHA. You should be asked to complete verification rather than being signed in. Then complete it and test a normal login. Avoid repeated submissions if your site also has a login-attempt limit.
If your site uses a renamed login URL, test that URL. A custom login page or third-party login form may use a different integration, so don’t assume it is protected just because wp-login.php is.
If reCAPTCHA isn’t working
The checkbox doesn’t appear
Return to the dashboard window you kept open. Check that the feature is enabled, WordPress Login is selected, and your changes were saved. Confirm that you chose v2 → I’m not a robot, rather than v3 or Invisible.
If those settings are right, check whether a browser extension, consent tool, firewall, or optimization setting is blocking Google’s reCAPTCHA scripts. Try a clean browser session. If your caching or performance plugin processes the login page, exclude that page and its CAPTCHA scripts from caching or delayed execution, then test again.
Google shows “Invalid key type” or a domain error
A key-type error usually means the Google key doesn’t match the selected version or challenge. Check for a v3 key being used with v2, or an Invisible key being used for a checkbox. A domain error means you need to check the hostname registered with Google, including whether you’re testing a staging or local address.
The checkbox loads, but login verification fails
Check that the site key and secret are a matching pair. Retest with a fresh challenge rather than an old, expired one. Your server must also be able to contact Google’s verification service. If it can’t, ask your host to check outbound requests and review your Google project’s usage or quota notices.
I can’t get back into WordPress
If your original admin session is still open, use it to correct the keys or temporarily turn off protection while you investigate. If you have no working admin session, ask your host to help you regain access. Temporarily disabling Swift Commerce also disables its other features, so treat that as a recovery step, not the first troubleshooting option on a live store.
Common questions
Do I need Swift Commerce Pro for this?
No. Google reCAPTCHA protection for WordPress Login is available in Swift Commerce Free. Google’s service has its own usage allowances and billing terms, separate from the plugin. Check Google’s current billing information for your project.
Can I use reCAPTCHA v3 instead?
Yes. Swift Commerce also supports Google’s score-based v3 option. It doesn’t show the checkbox used in this guide. You’ll need matching v3 keys and the v3 settings, so don’t switch versions without updating the keys too.
Will this protect my WooCommerce customer login too?
Not through the WordPress Login selection alone. Enable WooCommerce Login under Protected forms, save, and test the My Account login separately.
Does reCAPTCHA replace a strong password or two-factor authentication?
No. It adds a bot-verification check to the form. Keep using unique passwords, appropriate login-attempt controls, and two-factor authentication where available. reCAPTCHA doesn’t make a site immune to attacks.
Your login form is ready to check
Once the checkbox appears and you’ve confirmed a successful login, the setup is done. Keep your Google keys private where required, and test the form again after changing your login, caching, or security plugins.
For the other protected forms, provider options, and advanced settings, see the Swift Commerce reCAPTCHA documentation. You can also review the reCAPTCHA feature page to see what is included in Free and Pro.
For the next setup task, see the Turnstile login setup, the hCaptcha login setup.