


Adding hCaptcha to your WordPress login form gives automated sign-in attempts another check to pass. Visitors complete the verification, then submit their usual username or email address and password.
This tutorial shows you how to add hCaptcha to the WordPress admin login page with Swift Commerce’s reCAPTCHA feature. We will use the visible checkbox first, connect the correct keys, and verify that a legitimate login still works. There is no theme-file edit or custom PHP required.
hCaptcha is a Pro provider in Swift Commerce. Install Swift Commerce Free and Swift Commerce Pro, and make sure Pro access is active. The provider account and keys come from hCaptcha, not from Google reCAPTCHA.
Before you start
- Keep one browser window signed in to WordPress as an administrator. Do not log out of that session until the new setup is tested.
- Have an hCaptcha account for your website and access to its Sites and Settings areas.
- Know the hostname used by the actual login page.
- Use staging for the first test if the live site has other login or security customizations.
- Check whether another plugin already inserts a CAPTCHA on the same form. Use one integration for this form so scripts and verification checks do not compete.
The standard login address is usually https://example.com/wp-login.php. A logged-out visit to /wp-admin/ normally takes you to that screen. This guide targets that WordPress form, not a separate login popup built by a page builder.
1. Get your hCaptcha sitekey and secret
- Sign in to the hCaptcha dashboard as a website owner.
- Open Sites and create a site entry for your WordPress website, or open the site entry you already use for it.
- Give the entry a recognizable name and review its domain settings for the hostname where your login page runs.
- Copy the public sitekey for that site.
- Open Settings to obtain the secret used for server-side verification. If your account uses sitekey-specific secrets, use the secret associated with this sitekey.
The hCaptcha key setup reference identifies where these credentials are found. Sitekeys are public identifiers; secrets must stay private. Do not paste a secret into your login page, public documentation, or an unredacted screenshot.
Review domain allowlisting on the sitekey if you use it. Its allowed hostname must cover the site you are testing. hCaptcha documents the options in its configuration reference. Do not assume credentials created for an unrelated website will be suitable for this installation.
For the first setup, use a normal visible challenge configuration. Leave more advanced provider-side behavior alone until you have confirmed that the standard login works.
2. Select hCaptcha in Swift Commerce
- Go back to your open WordPress administrator window.
- Open Swift Commerce → Security & Privacy → reCAPTCHA.
- Choose the Setup tab.
- Under CAPTCHA Provider, select hCaptcha.
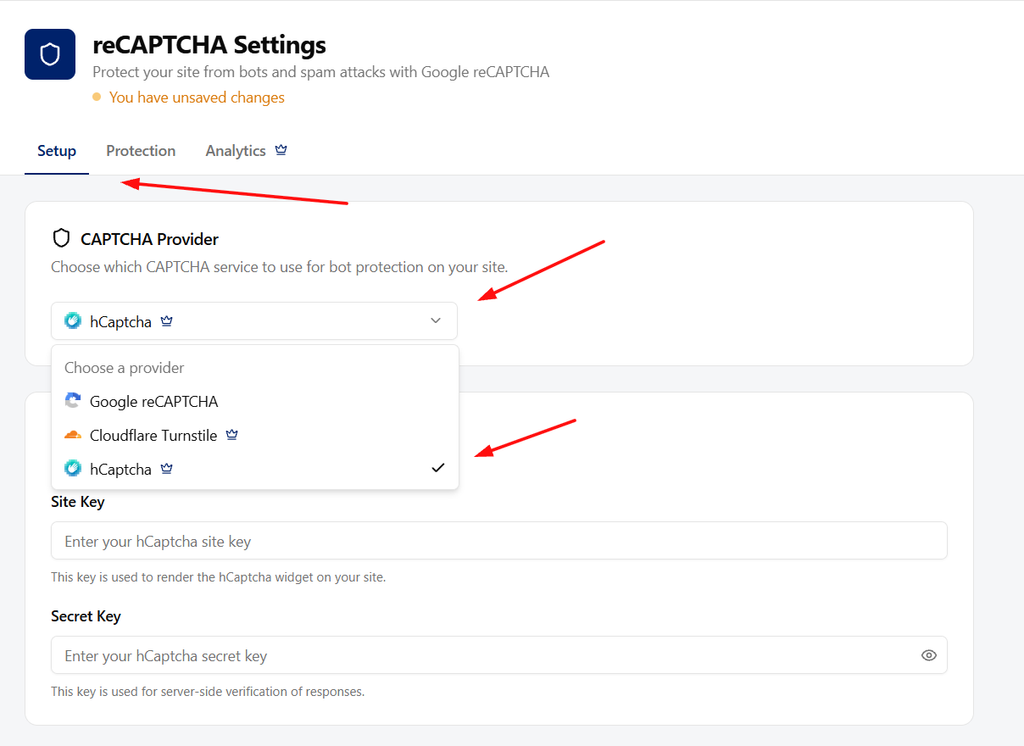
The sidebar entry remains reCAPTCHA even though hCaptcha is a different service. Use the provider dropdown inside that feature rather than looking for a separate hCaptcha dashboard menu.
If hCaptcha is missing from the dropdown, check that Swift Commerce Pro is installed, active, and recognized by the dashboard. Google reCAPTCHA is available in Free; choosing hCaptcha requires Pro.
Changing the provider applies to every form currently selected under Protection. For example, if password reset is already protected, it will use hCaptcha after this change too. Plan to test each affected form, not just login.
3. Enter the hCaptcha keys and choose the checkbox
- In hCaptcha API Keys, paste your sitekey into Site Key.
- Paste the matching secret into Secret Key.
- Find Widget Mode and select Visible checkbox.
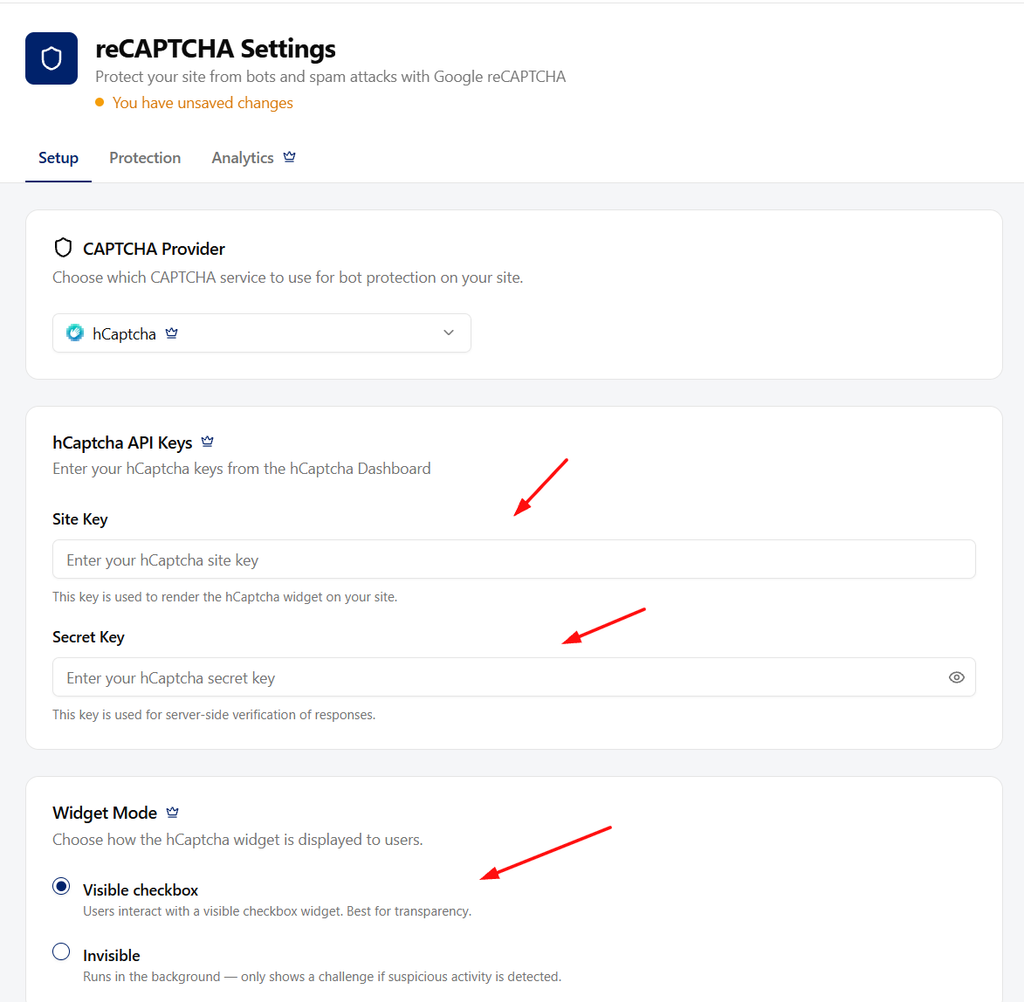
Do not use your Google reCAPTCHA or Turnstile credentials in these fields. Each provider verifies its own keys.
Visible checkbox is a useful starting point because you can see where the challenge is displayed and check its spacing on the login form. If you later choose Invisible, run the login tests again; hiding the checkbox does not mean that a visitor can never be challenged.
hCaptcha explains that difference in its invisible CAPTCHA guide. Invisible mode is not the same as a guarantee of fully passive, challenge-free verification.
4. Enable protection for WordPress Login
- Open the Protection tab.
- Under Protected forms, select WordPress Login.
- Review the other selected forms and keep only the locations you intend to protect.
- Enable the feature with the switch in the page header if it is off.
- Click Save Changes.
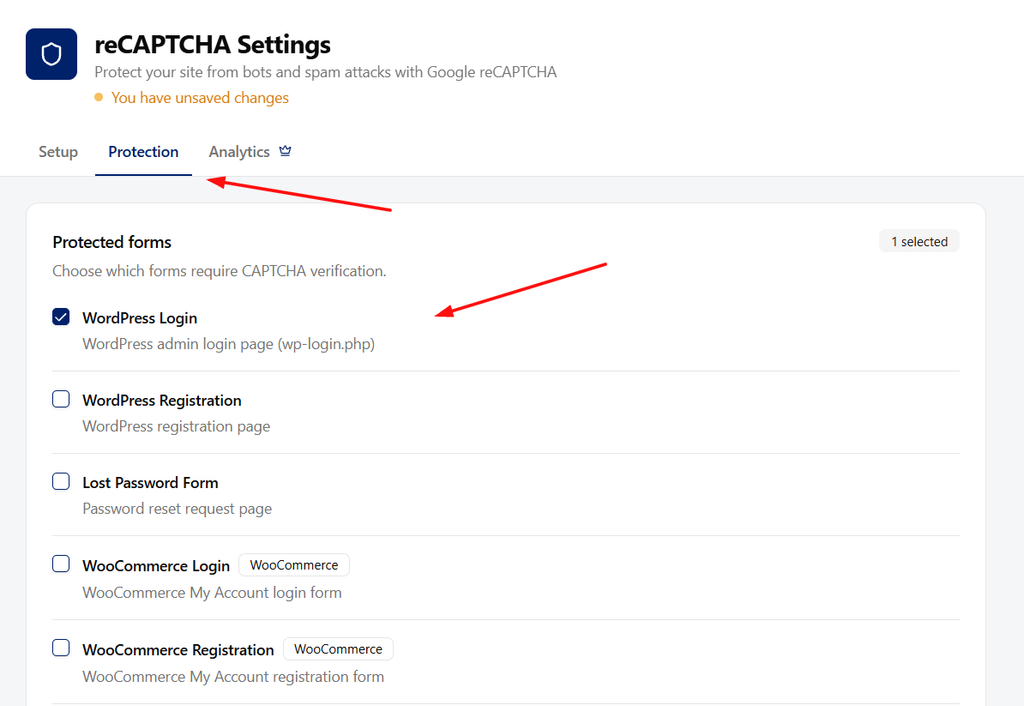
Select WordPress Login for wp-login.php. WooCommerce Login is a different option for the store’s My Account login form.
Saving a provider without selecting the intended form does not complete the setup. The provider, credentials, feature switch, and protected-form selection all need to be correct.
After saving, the Secret Key field may be blank while indicating that a secret is configured. Swift Commerce does not return the saved secret as ordinary settings text. Leave it alone unless you intend to replace or clear it.
5. Test both a successful login and an incomplete verification
- Keep the original administrator session open.
- Open a private browser window and visit the WordPress login page.
- Check that the hCaptcha checkbox appears without clipping or covering the login button.
- Enter valid credentials for a test account, but do not complete the checkbox. A login should not complete without valid CAPTCHA verification.
- Complete the challenge, then submit the login form. Confirm that the legitimate login succeeds.
- Repeat the normal login test on mobile and check any other forms affected by the provider change.
Use a connection that is not covered by an IP whitelist. Otherwise you may be testing an intentional bypass rather than the verification itself.
If the checkbox is visible but a completed challenge still fails, check the secret as well as the sitekey. The browser widget and the server-side verification are separate parts of the setup; Swift Commerce handles both when properly configured.
If the checkbox is missing or verification fails
Make sure you are testing the correct form
WordPress Login protects the standard WordPress login screen. A custom theme login panel or membership form may use a different rendering or submission route. Check the standard form first, and verify compatibility before promising protection for another form.
Check keys, hostname settings, and duplicate integrations
Confirm that hCaptcha is the selected provider, the keys are correct, and domain restrictions allow your website. Check that another plugin is not also adding hCaptcha or Google reCAPTCHA to the form. Configure and test one CAPTCHA integration at a time on staging.
Check browser and performance settings
A browser extension, content-security policy, consent setting, or JavaScript delay can stop the widget from loading. Check the browser console or ask your host to help identify the blocked resource. Use a targeted fix for the CAPTCHA script rather than disabling every optimization or security feature.
Check whether a bypass is expected
An IP whitelist can skip CAPTCHA for a trusted connection. Role bypass applies only to users who are already logged in. It does not exempt a logged-out visitor simply because they enter an administrator username.
If a fresh login fails, return to the administrator session you kept open, correct the configuration, or temporarily turn off WordPress Login protection while you investigate. If you have lost access to every admin session, contact your host or Swift Commerce support for recovery help.
Frequently asked questions
Does hCaptcha replace Google reCAPTCHA?
For the forms selected in this Swift Commerce feature, yes: choose hCaptcha instead of Google reCAPTCHA. If you prefer Google, follow the separate Google reCAPTCHA login tutorial. Do not run both providers on the same form as a substitute for testing.
Will this apply only to administrators?
No. WordPress Login is the form location, not a user-role filter. The standard login page can be used by administrators and other account roles.
Can hCaptcha work without showing a checkbox?
Swift Commerce includes an Invisible option for hCaptcha. Set up and verify Visible checkbox first, then test the invisible flow separately. hCaptcha may still display a challenge when required.
Does this secure every way of authenticating to WordPress?
No. This tutorial covers the standard WordPress login form. Do not assume that it changes REST API authentication, XML-RPC, a mobile application, or a third-party login form.
Once the fresh login and failure checks work, keep your saved configuration and close the spare session. The Swift Commerce CAPTCHA documentation covers the remaining form and protection options.
For the next setup task, see the alternative Turnstile login setup.