


Your WordPress login form is an easy target for automated sign-in attempts. Adding Cloudflare Turnstile gives that form a verification step before a login submission is accepted, without asking every visitor to work through an image puzzle.
This guide shows you how to add Cloudflare Turnstile to the WordPress admin login page using Swift Commerce’s reCAPTCHA feature. You will create a Turnstile widget, connect its keys, select the WordPress Login form, and test the result. You do not need to edit your theme or paste a verification script into WordPress.
In Swift Commerce, Cloudflare Turnstile is a Pro provider. You need Swift Commerce Free installed alongside Swift Commerce Pro, with Pro access active. Google reCAPTCHA is the provider available in Free; a Cloudflare account is separate from your Swift Commerce license.
Before you change the login page
- Keep your current WordPress administrator session open in one browser window. Use a separate private window for testing.
- Have a Cloudflare account and access to the Turnstile area of its dashboard.
- Know the actual hostname used by your login page, such as example.com or www.example.com.
- Have access to your hosting support or control panel in case a configuration mistake prevents a fresh login.
- If another plugin already adds a CAPTCHA to this form, plan to use only one CAPTCHA integration on it. Test the change on staging first.
The standard WordPress login page is usually at https://example.com/wp-login.php. Visiting /wp-admin/ while logged out normally redirects you there. This guide protects the standard login form, not the administration screens after you have signed in.
1. Create a Cloudflare Turnstile widget
- Sign in to the Cloudflare Turnstile dashboard.
- Select Add widget.
- Give it a recognizable name, such as Store WordPress Login.
- Under hostname management, add the hostname where the login form runs.
- Choose Managed as the widget mode.
- Create the widget and copy its sitekey and secret key.
Cloudflare’s widget setup instructions cover these dashboard controls. Keep the secret key private; it belongs in the plugin’s Secret Key field, not in a blog screenshot or public page.
Use a hostname such as example.com, not the full https://example.com/wp-login.php address. Cloudflare’s hostname rules explain the allowed format and subdomain coverage. A widget configured only for a staging hostname will not automatically cover an unrelated live domain.
Managed mode lets Cloudflare decide whether a visitor needs to interact with a checkbox. It does not mean that every visitor will have to click. See Cloudflare’s widget modes reference for the distinction.
2. Open Swift Commerce’s CAPTCHA setup
- Return to the WordPress dashboard without closing your administrator session.
- Open Swift Commerce → Security & Privacy → reCAPTCHA.
- Select the Setup tab.
- In CAPTCHA Provider, choose Cloudflare Turnstile.
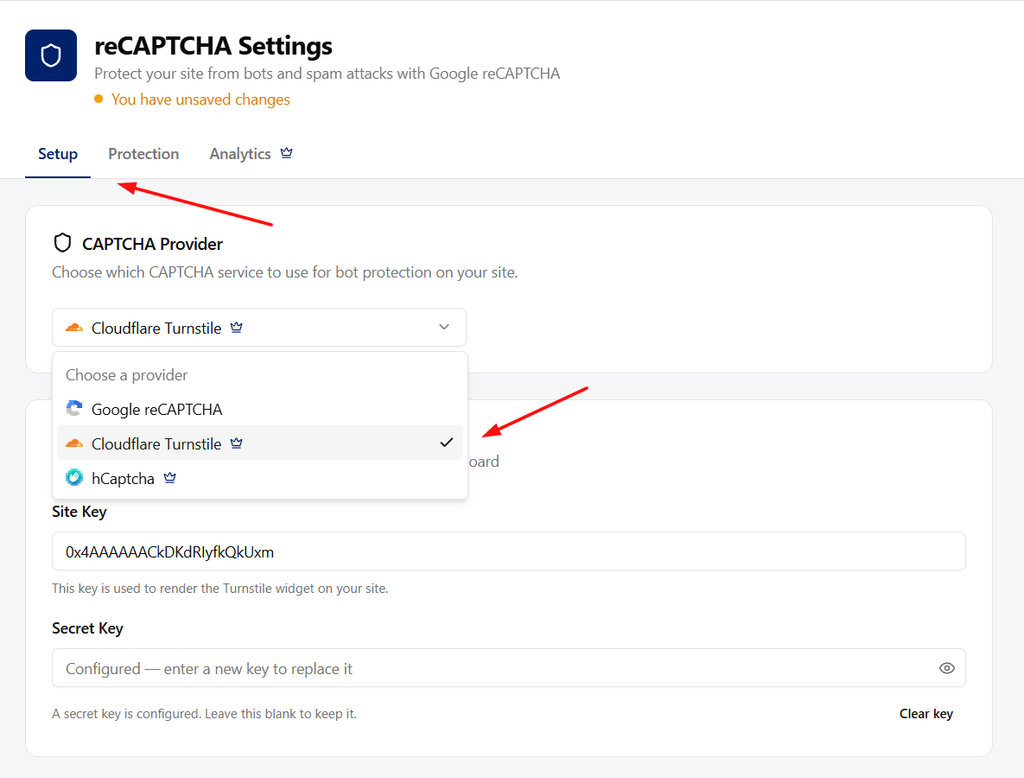
The feature is still named reCAPTCHA in the sidebar, even when you use Turnstile. That is where Swift Commerce groups its supported CAPTCHA providers.
If the dropdown only offers Google reCAPTCHA, check that Swift Commerce Pro is installed, active, and recognized by the dashboard. Turnstile will not appear as a selectable Free provider.
There is one provider selection for this feature. Changing it also changes the provider used by the other forms already selected under Protection. Check those forms as part of your test rather than assuming they will keep using Google reCAPTCHA.
3. Add the Turnstile keys
- Find Turnstile API Keys.
- Paste the widget’s sitekey into Site Key.
- Paste the matching secret into Secret Key.
- Under Widget Mode, choose Always visible for the initial setup.
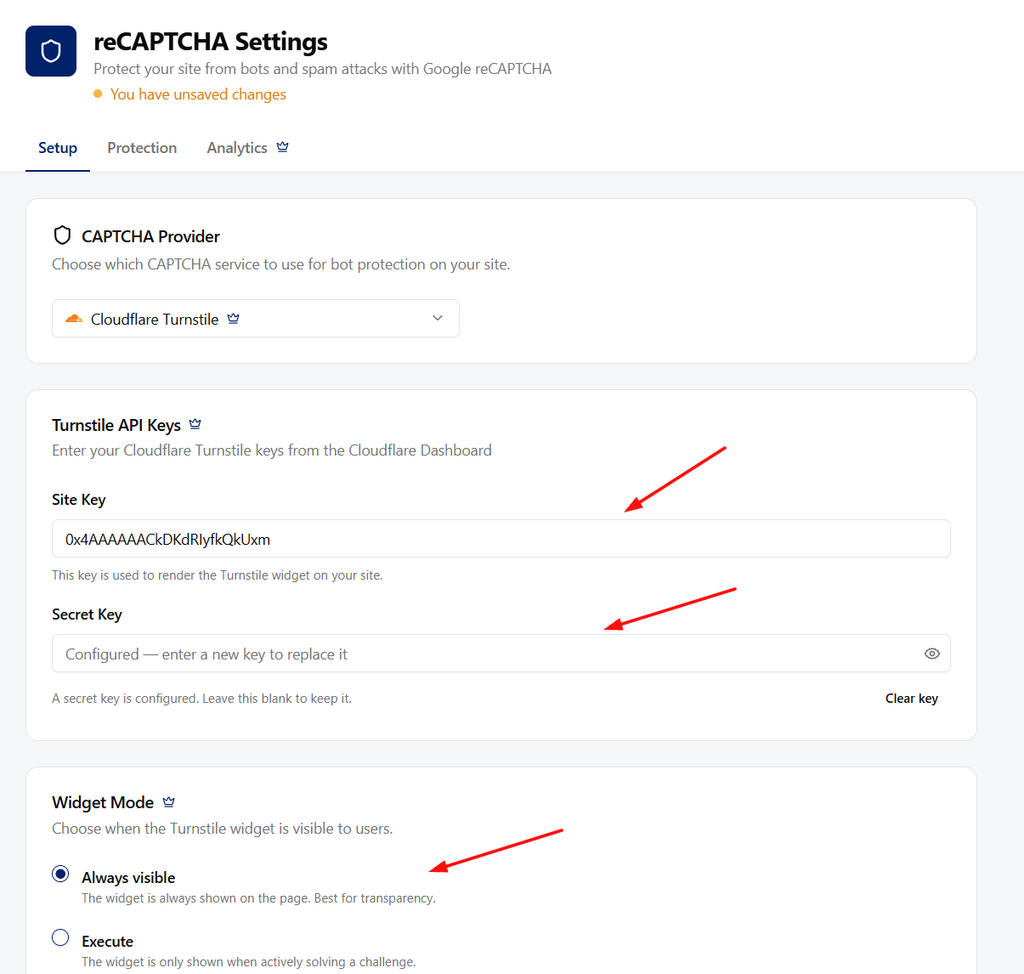
Cloudflare’s Managed mode and Swift Commerce’s Widget Mode setting are different controls. Managed determines the type of challenge Cloudflare runs. Always visible controls whether the widget is shown on the form. Starting with a visible widget makes the first test easier.
You can later use Execute or Interaction only if that suits your form, but test again after changing the appearance. Do not treat a hidden widget as proof that verification is disabled.
4. Select WordPress Login and save
- Open the Protection tab.
- In Protected forms, select WordPress Login.
- Review the other selected forms. Keep any protection you already intend to use; do not enable unrelated forms without testing them.
- Turn on the feature using its header switch if it is currently off.
- Click Save Changes.
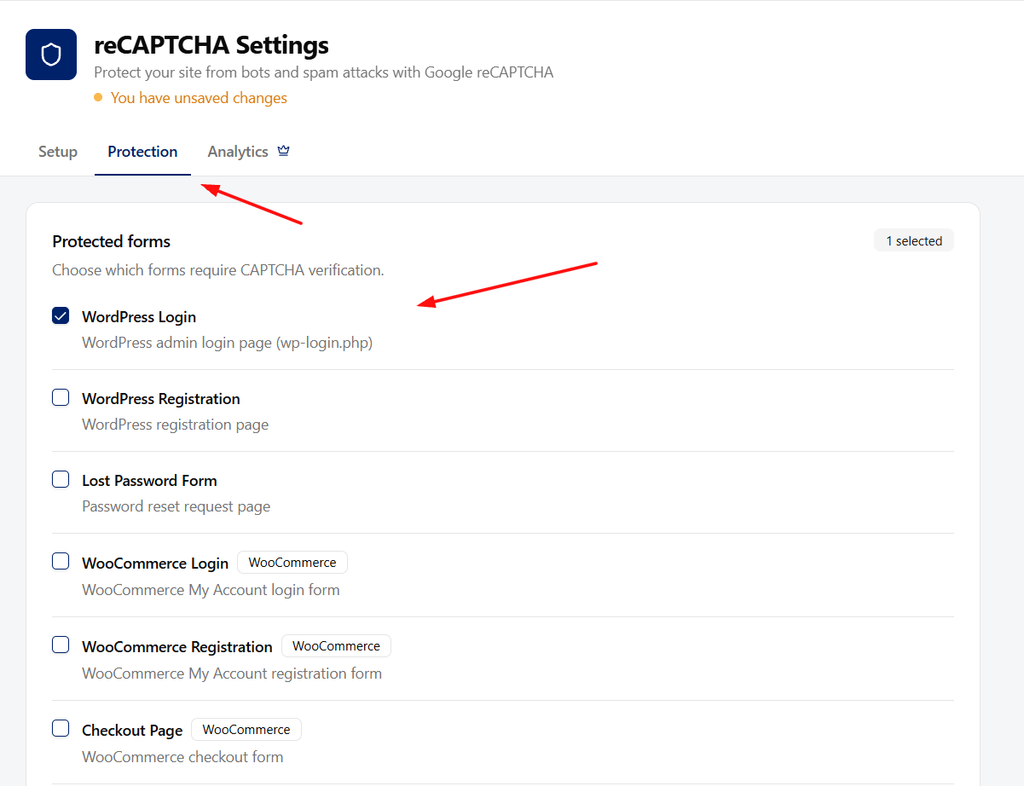
WordPress Login is the setting for wp-login.php. WooCommerce Login protects the customer login form on My Account instead. They are separate locations.
After saving, Swift Commerce may show the secret field as configured without displaying the saved value. That is expected. You do not need to paste the secret again every time you open the settings.
5. Test a fresh login without losing your admin session
- Leave the original administrator window open.
- Open a private browser window and visit your actual WordPress login page.
- Confirm that Turnstile loads and finishes its verification. Complete the checkbox if Cloudflare requests it.
- Sign in with a valid test account and confirm that the login succeeds.
- On staging, also check that a login cannot complete when no valid verification is supplied. Do not test this from an IP address you have whitelisted.
- Repeat the normal login test on mobile and check any other forms affected by the provider change.
A visible success state checks the browser side of the flow. A successful form submission also needs server-side verification, which Swift Commerce handles with the configured secret. A widget that merely appears on the page is not enough to call the setup complete.
If you enable Verification analytics → Collect analytics under Protection, the Analytics tab can help you review recorded checks. Analytics collection is optional and is not required to protect the login form.
If Turnstile does not appear or login fails
Check the provider, keys, and selected form
Confirm that Cloudflare Turnstile is selected, both keys belong to the same widget, WordPress Login is checked, and the feature is enabled and saved. Google reCAPTCHA keys cannot be used in the Turnstile fields.
Check the hostname and scripts
Compare the hostname in the browser with the widget’s allowed hostnames. If you use a custom login URL, confirm that its underlying form is supported. Check whether a content-security policy, script delay, consent setting, or browser extension is preventing Turnstile from loading. Test a targeted script exclusion on staging rather than turning off security controls across the site.
Check exclusions before assuming the widget is broken
An IP whitelist can intentionally skip CAPTCHA for your connection. Role bypass applies to users who are already logged in; selecting Administrator is not a way to exempt someone entering administrator credentials on a logged-out login form.
If a new login fails, use your still-open administrator session to correct the configuration or temporarily disable protection for WordPress Login. If you no longer have an administrator session, contact your host or Swift Commerce support for recovery help. Avoid repeatedly changing keys or resetting every setting while locked out.
Frequently asked questions
Does this protect only administrator accounts?
No. It protects the standard WordPress login form used by different user roles. “Admin login page” is the common name for that screen, not a restriction to the administrator role.
Will this also protect WooCommerce registration?
Not just by selecting WordPress Login. Select WooCommerce Registration separately to protect the customer registration form on My Account. Test the customer flow before enabling it on a live store.
Can I use Google reCAPTCHA on one form and Turnstile on another?
Not through this feature’s single provider selection. The selected provider is shared across the forms you enable. Avoid running competing CAPTCHA integrations on the same form.
Does Turnstile replace a strong password or two-factor authentication?
No. It helps check automated form submissions. Continue using strong passwords, appropriate account permissions, updates, and any other login protection your site requires.
Once a fresh login works and the failure path has been checked, you can close the spare administrator session. Keep the Swift Commerce CAPTCHA documentation handy if you later change providers or protect additional forms.
For the next setup task, see protecting WooCommerce registration with Turnstile.