


Requiring admin approval for WordPress registrations lets you review each new application before the account can sign in. This is useful if you need to check business applicants or decide who can join your site.
Swift Commerce Pro lets you hold registrations for manual review. A person submits the form and creates a password, but cannot sign in until you approve the account. You manage those requests in Registration & Access → Registrations.
This guide covers the native WordPress registration form. We’ll also point out the separate setting for WooCommerce My Account registrations.
Current dashboard: Registration Form and Email Verification now share Registration & Access. The screenshots below show the earlier separate screens. Use Forms for custom fields, Access for verification or approval, Emails for messages and Pro’s Registrations for review. The steps below use those current locations.
In this guide
Admin approval is different from email verification
Email verification lets a user confirm access to an email inbox using a link. Admin approval lets you decide whether the account should be allowed to sign in.
In Swift Commerce, these are alternative modes within the same feature. Selecting Admin Approval does not create a two-stage “verify your email, then wait for approval” workflow. If you only need email ownership confirmed, use Email Verification mode instead.
What you need
- Administrator access to a standard WordPress installation.
- Swift Commerce Free and Pro installed and active, with Pro access available.
- A registration form you intend to make public.
- A working administration email address and a separate test-user email address you control.
Start on staging and keep your administrator session open. This walkthrough uses the native registration form on a single WordPress site. Multisite registration and third-party membership forms can follow different registration paths and need their own compatibility checks.
1. Enable admin approval for WordPress registrations
- Open Swift Commerce → Registration & Access. Use feature search if you do not see it in the sidebar.
- Open Access and turn on Require an access check.
- In Access → Registration forms, enable WordPress Registration.
- In the same Access tab, find Verification Mode.
- Under Verification Mode, select Admin Approval.
- Click Save Changes.
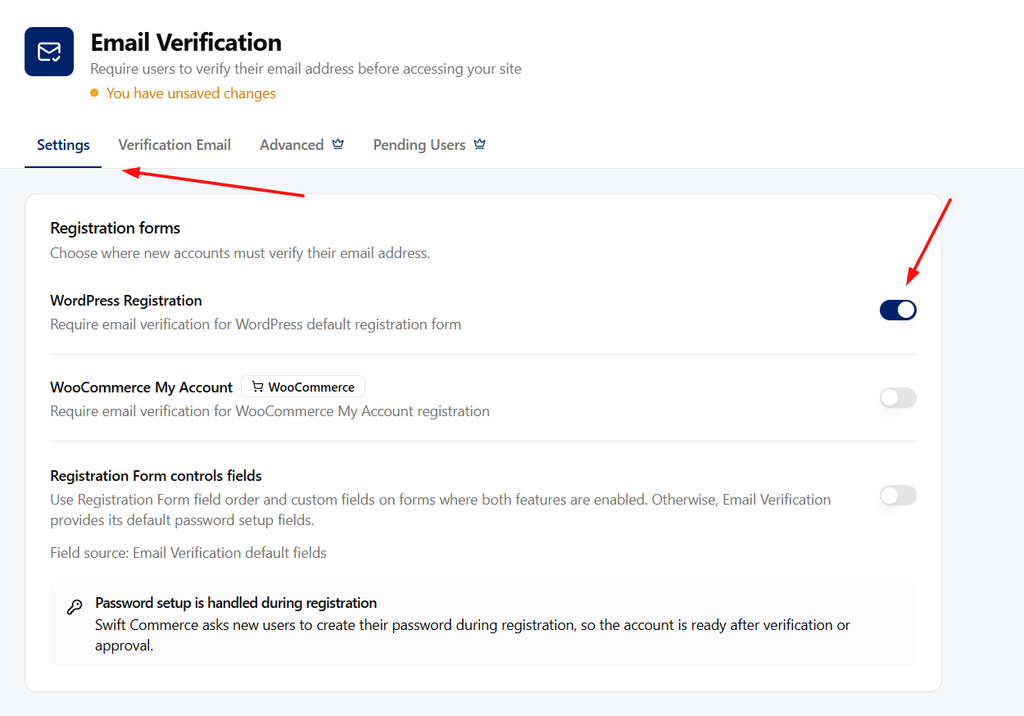
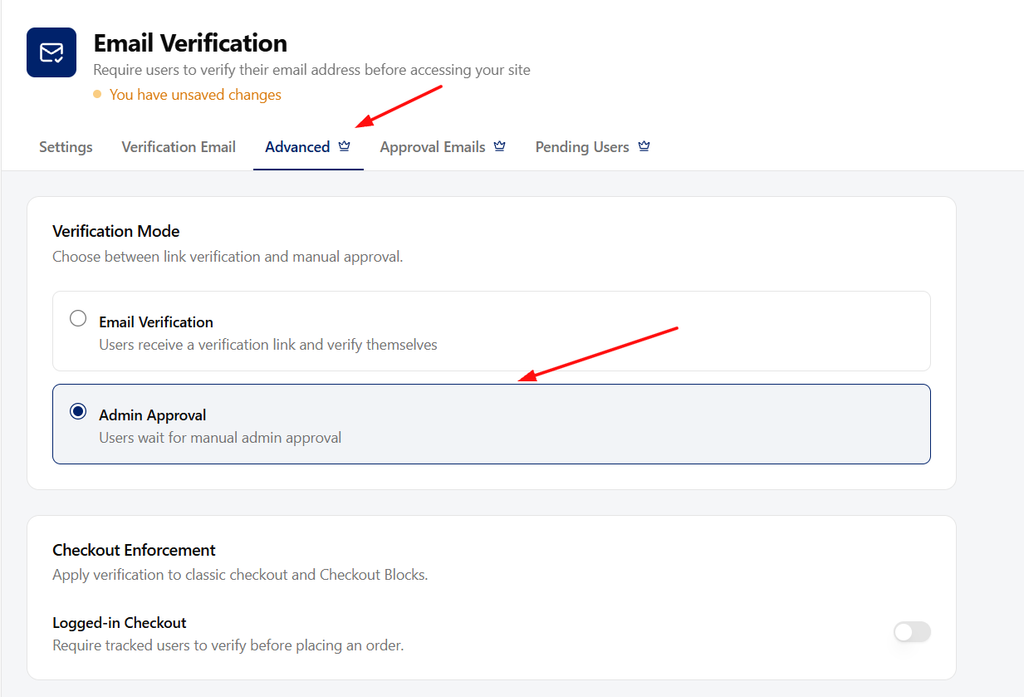
Keep WooCommerce My Account off unless you also want that registration form to use the selected mode. Verification Mode is shared by the forms you enable here; it is not a separate mode for each form.
If Admin Approval is unavailable, confirm that Pro is active and recognized. Free provides email-link verification, not manual approval.
2. Make sure new users are not exempt
Open Access → Role exemptions. For the native WordPress form, new users commonly receive the Subscriber role. Leave Subscriber unchecked if those registrations must wait for your approval.
Check any custom role your registration setup assigns as well. A selected role bypasses the verification or approval requirement; selecting it here does not assign the role.
If Swift Commerce Registration Form is also enabled for the same registration form, use Registration Form controls fields to keep that feature’s field order and custom fields. Otherwise, Email Verification supplies its default password setup fields. Save any changes.
3. Configure the approval notifications
After choosing Admin Approval, open Emails and find the approval notifications. It contains four separate notifications:
- Pending Approval Email: tells the applicant the account is waiting for review.
- Account Approved Email: tells the user they can now sign in.
- Admin Notification Email: alerts the site administrator to a new registration needing review.
- Account Rejected Email: informs the applicant when you reject the registration.
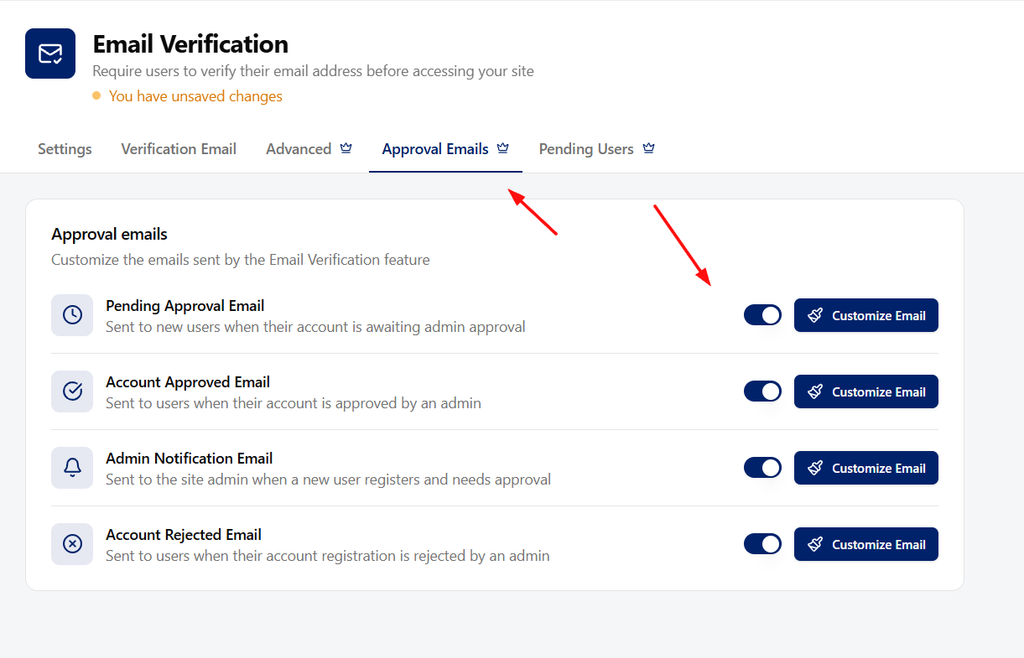
Keep the notifications needed for your review process enabled. In particular, applicants should know they are waiting for approval, and your team needs a reliable way to notice new requests.
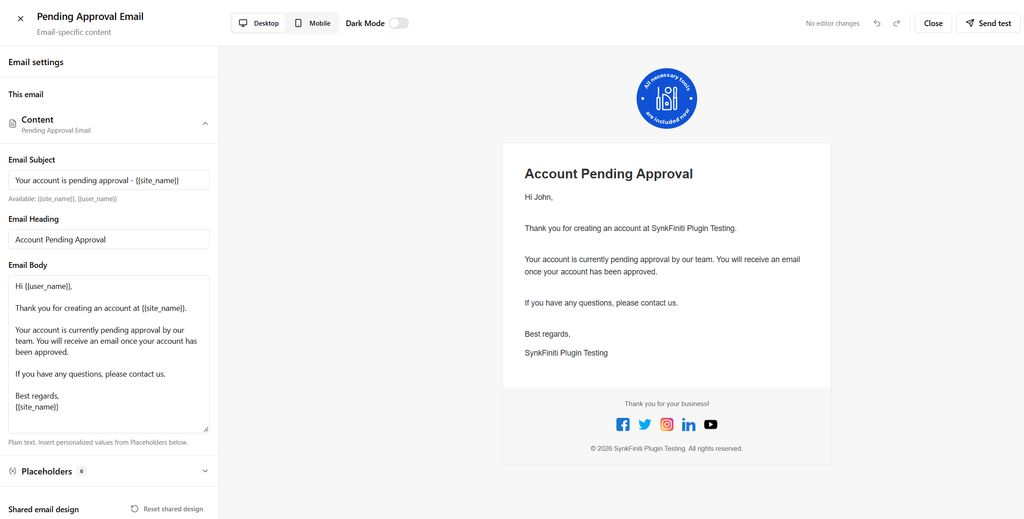
- Click Customize Email beside an enabled notification.
- Edit its subject, heading and message in the built-in Email Customizer.
- Use only the placeholders available for that template. For example, keep
{{login_link}}in an approved-account message if you want a login link, and use{{admin_link}}in the administrator notification. - Preview the email, save it and send a test to an address you control.
- Repeat for the other messages you intend to send, then save any remaining feature changes.
The administrator notification goes to WordPress’s Administration Email Address under Settings → General, not automatically to every administrator’s profile email. Check that it reaches the person responsible for reviewing registrations. See WordPress’s General Settings reference if you need to check that address.
Avoid promising an instant response or a fixed approval deadline in the pending message unless your team can meet it. A short explanation of what happens next is more useful.
4. Enable the native WordPress registration form
If native registration is already enabled, check the following settings without changing an established role policy unnecessarily.
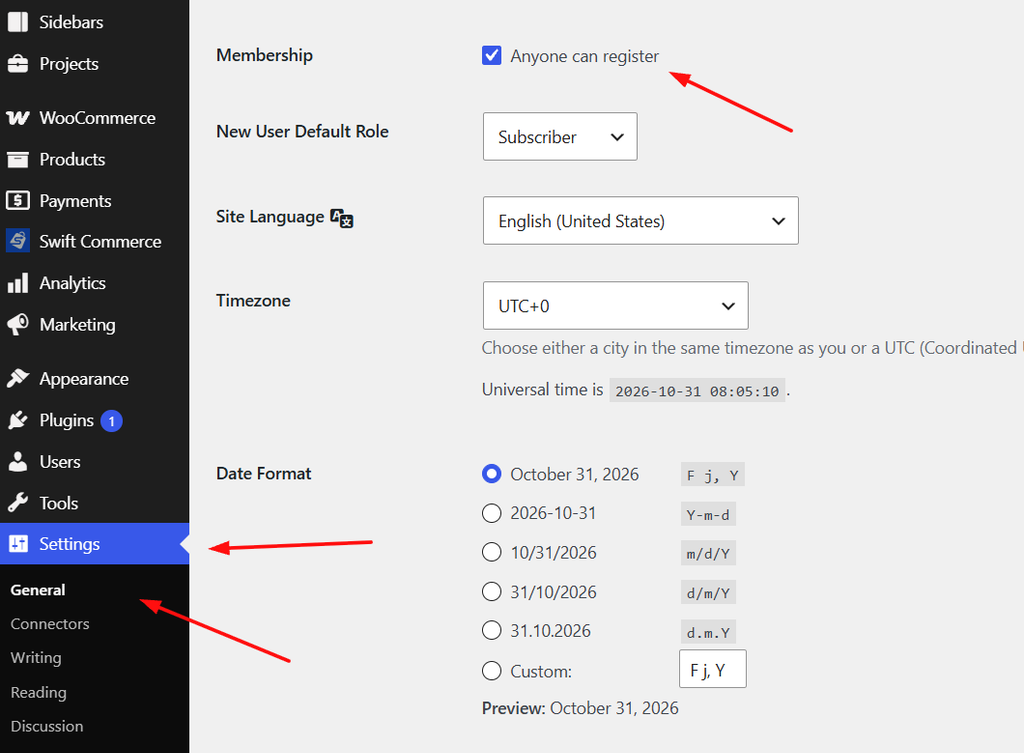
- Open Settings → General in WordPress.
- Under Membership, select Anyone can register if you intend to accept public registrations.
- Set New User Default Role to Subscriber for a normal low-privilege signup, unless your site has a carefully defined alternative.
- Click Save Changes.
- In a private browser window, open your own site’s
/wp-login.php?action=registerpage.
Do not use Administrator as the default role for public registrations. Manual approval is a review step, not a reason to give public applicants elevated permissions.
Swift Commerce handles password setup during the protected registration flow. The applicant should create their password on the form rather than needing you to email them a password after approval.
5. Submit a registration and verify that it stays pending
- Use the private window to register a new account with an email address you control.
- Complete the password and confirmation fields shown by your form.
- Check that the page explains the account is awaiting approval.
- If its notification is enabled, confirm that the applicant receives the pending-approval email.
- Check the administration inbox for the new-registration notification.
- Before approving anything, try signing in with the new account’s correct username and password.
The sign-in attempt should be blocked with a pending-approval message. Creating the WordPress account is expected; the approval gate controls whether that tracked account can sign in.
A test email alone does not check this behavior. You need the actual registration and blocked-login test.
6. Review and approve the account
- In your administrator session, return to Swift Commerce → Registration & Access.
- Open Registrations and choose Pending approval in the Status filter.
- Search for the test applicant and check the username, email address and registration date.
- Complete whatever review your business requires outside the plugin.
- Click Review. In Review action, choose Approve account. Select Queue the configured applicant email, if enabled if you intend to send the enabled approval notification, then apply the action and confirm.
- If enabled, confirm the applicant receives the Account Approved Email.
- Return to the private window and sign in using the password chosen during registration.
Approval allows the account through this login gate. It does not automatically give the user a different role, grant access to a separate membership product or establish their identity.
Review each applicant’s submitted details before granting access. The current Registrations screen opens an individual Review panel; do not follow bulk-action instructions from the earlier Pending Users screen.
7. Handle rejections carefully
Rejecting an application retains the WordPress account with access restricted. It does not delete the user. You can later choose Reopen for review to return it to Pending approval, but reopening does not grant access.
If a request needs more information, leave it pending while you review it. Do not use Reject as a temporary hold.
To reject an application, open its Review panel and select Reject application. Add an internal note or optional message to the applicant. To send the enabled rejection email, select Queue the configured applicant email, if enabled. Read and confirm the action. Internal notes are not included in applicant emails.
Test rejection and reopening with a disposable staging account, then check that sign-in stays blocked in both Rejected and Pending approval states. Deleting a WordPress user is a separate administrative action.
8. Leave automatic cleanup off until your process is settled
In Access → Links, Resends & Retention, leave Auto-delete Unverified Users set to Never during setup.
Current cleanup excludes approval applications and restricted accounts. It also protects privileged users and accounts with existing orders or authored content. Eligible unverified email-registration accounts can still be deleted after the configured retention period, so choose that policy deliberately rather than treating it as queue management.
Questions you may have
Can I require admin approval for WooCommerce registrations too?
Yes. Enable WooCommerce My Account in Registration & Access → Access → Registration forms, keep Admin Approval selected, and confirm that Customer (WooCommerce) is not exempt. Enable My Account registration in WooCommerce’s Accounts & Privacy settings and repeat the pending, approval and login tests on that form.
Will existing WordPress users suddenly need approval?
Not automatically. Existing users without Swift Commerce’s verification tracking are allowed through the login check. This is a workflow for new registrations captured by the enabled integration, not a bulk review of every account on the website.
Does the applicant also have to click a verification link?
Not in Admin Approval mode. You approve the registration manually. Email Verification mode is the separate link-confirmation option. For a WooCommerce store, see our customer email verification walkthrough.
Why does a test registration skip approval?
Check that the feature is enabled, WordPress Registration is on, Admin Approval is saved, and the assigned role is not exempt. Use a new account registered through the native form. Users created manually in the dashboard or through another plugin may not follow this registration path.
Why is the pending list empty?
Confirm the registration went through a protected form and was not exempt. Refresh the list and clear its search filter. If the dashboard reports a loading error, use Retry rather than assuming no accounts are waiting.
Why did the administrator notification not arrive?
Check its toggle in Emails and the site’s Administration Email Address. Test email delivery separately. An applicant can still be pending even if a notification fails, so check Registrations while diagnosing mail delivery.
Does this hide the website or make it a private membership site?
No. It controls sign-in for tracked, pending accounts. Restricting public pages, products or membership content requires the appropriate access rules for your site.
Before you enable it for real applicants
Complete one full test: submit a registration, confirm sign-in is blocked, approve the account and confirm sign-in succeeds. Check both the applicant and administrator emails along the way. Then decide who will monitor the queue and how often they will review it.
For the complete settings reference, read the Registration & Access documentation. The feature overview explains the wider Free and Pro options.
For the next setup task, see customizing the WordPress registration fields.