


The default WordPress registration form collects a username and an email address. That is enough to create an account, but not enough if you also need a company name, a phone number or a reason for registering.
This guide shows you how to create a custom WordPress registration form with Swift Commerce’s Registration & Access workspace. We will add a company-name field, make it required, add an optional dropdown and test a new registration without editing PHP.
One distinction matters before you start: this method customizes the existing WordPress registration screen. It does not create a separate registration page that you can embed anywhere with a shortcode.
Current dashboard: Registration Form and Email Verification now share Registration & Access. The screenshots below show the earlier separate screens. Use Forms for custom fields, Access for verification or approval, Emails for messages and Pro’s Registrations for review. The steps below use those current locations.
In this guide
Before you start
- A WordPress site with Swift Commerce installed and active. Swift Commerce is a WooCommerce suite, so use it within your existing WooCommerce setup.
- An administrator account so you can manage registration settings.
- A spare email address for testing a new account.
- A staging site if registration is already in use. Test there before changing a live signup flow.
The WordPress registration setup covered here is available in Swift Commerce Free. WooCommerce registration locations and advanced controls require Pro. This walkthrough follows a standard single-site WordPress installation; a Multisite network can have its own signup policy.
1. Allow visitors to register in WordPress
- In your WordPress admin, open Settings → General.
- Under Membership, select Anyone can register.
- Set New User Default Role to Subscriber, unless your site has a specific, carefully reviewed reason to use another low-permission role.
- Click Save Changes.
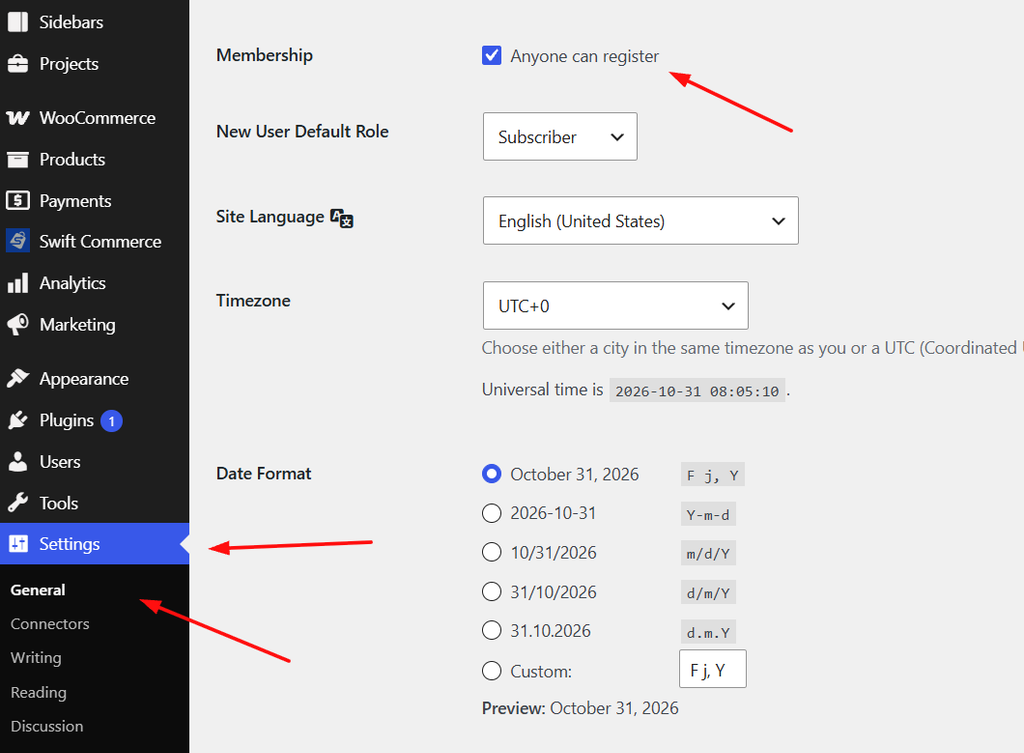
Do not select Administrator or another privileged role for public signups. WordPress explains the registration setting and user permissions in its user-management guide.
Open https://your-site.com/wp-login.php?action=register in a private browser window, replacing the domain with your own. You should see the registration form. If registration is disabled there, resolve that first; adding custom fields does not switch on public registration by itself.
2. Enable the Registration Form feature
- Open Swift Commerce in WordPress admin.
- Choose Registration & Access. You can also find it with the dashboard’s feature search.
- Open Forms → Fields and turn on Customize registration fields.
- In the same tab’s Form Context section, enable WordPress Registration.
- Click the page-level Save Changes button.
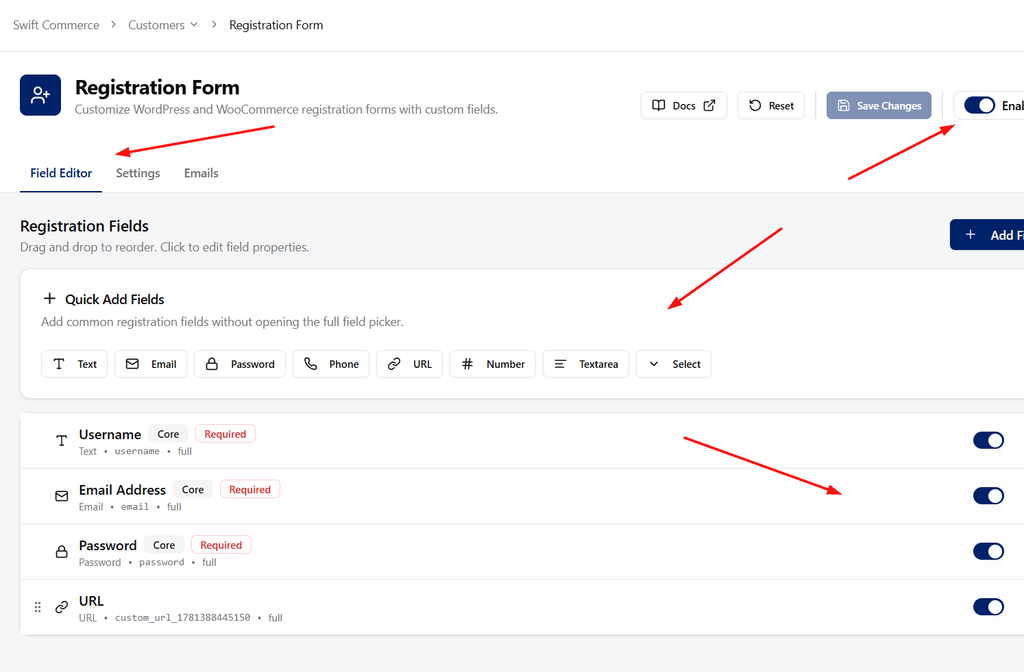
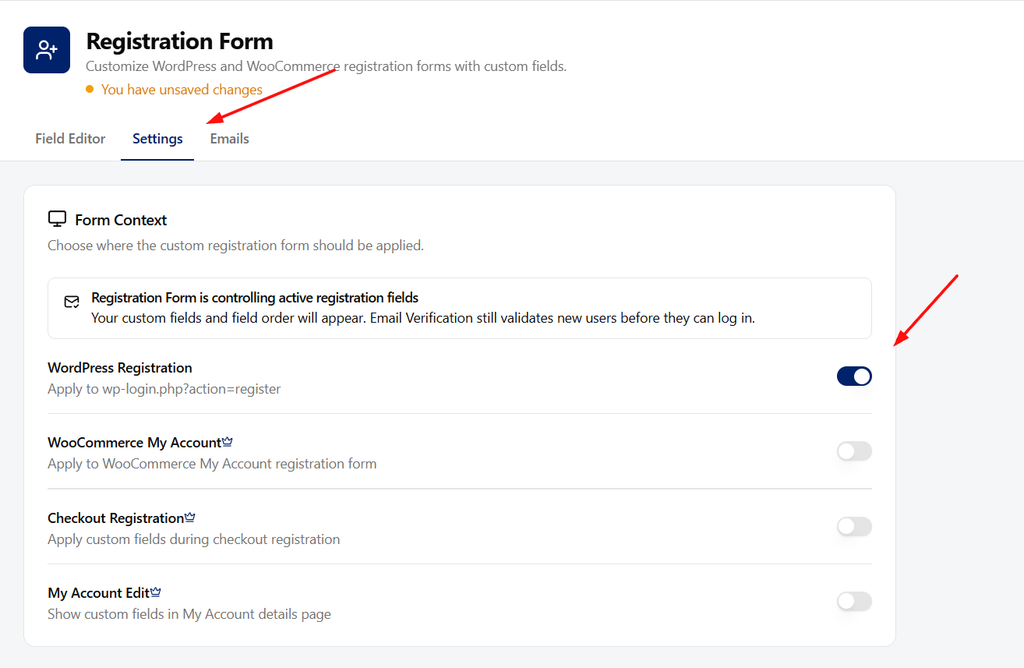
There are separate settings for WooCommerce My Account, Checkout Registration and My Account Edit. Leave those alone for this tutorial. They are not needed to customize the native WordPress registration screen.
3. Add a required company-name field
- Stay in Forms → Fields and find the field editor below the form-location controls.
- Click Add Field, then choose Text.
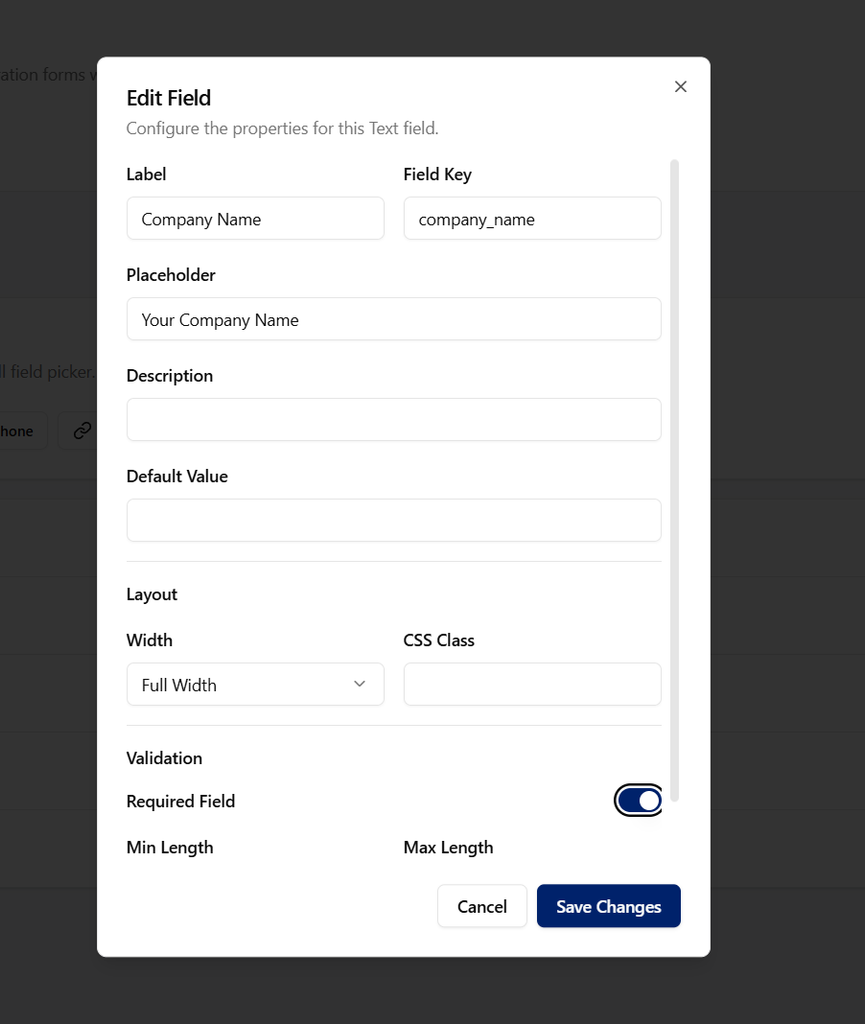
- In Edit Field, set Label to Company name.
- Set Field Key to
registration_company. - Set Placeholder to Enter your company name.
- Add a short description if visitors need context, for example: The business you are registering on behalf of.
- Under Validation, switch on Required Field. For this example, set Max Length to 80 and leave Min Length empty.
- Click Save Changes in the field editor.
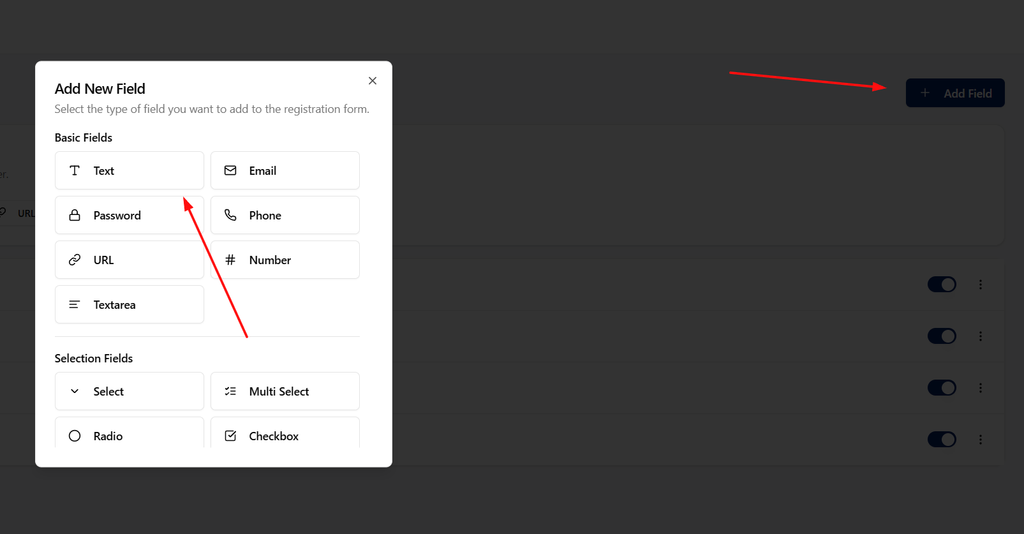
The label is what visitors read. The field key identifies the saved value, so use a unique, descriptive key and keep it stable after people start registering. Do not reuse WordPress’s built-in username, email or password keys for an unrelated custom field.
Company name is only an example. If it does not help you serve or review new users, do not collect it. A shorter registration form is usually more useful than a form full of information you never use.
4. Add an optional dropdown
A dropdown works better than a text box when you need people to choose from a small set of answers. Here is an example that asks what they are interested in.
- Click Add Field → Select.
- Set Label to What are you interested in? and Field Key to
registration_interest. - Use Choose an option as the placeholder.
- Leave Required Field off.
- Under Options, add these value-and-label pairs:
products/ Buying products,wholesale/ Wholesale enquiries, andother/ Something else. - Save the field.
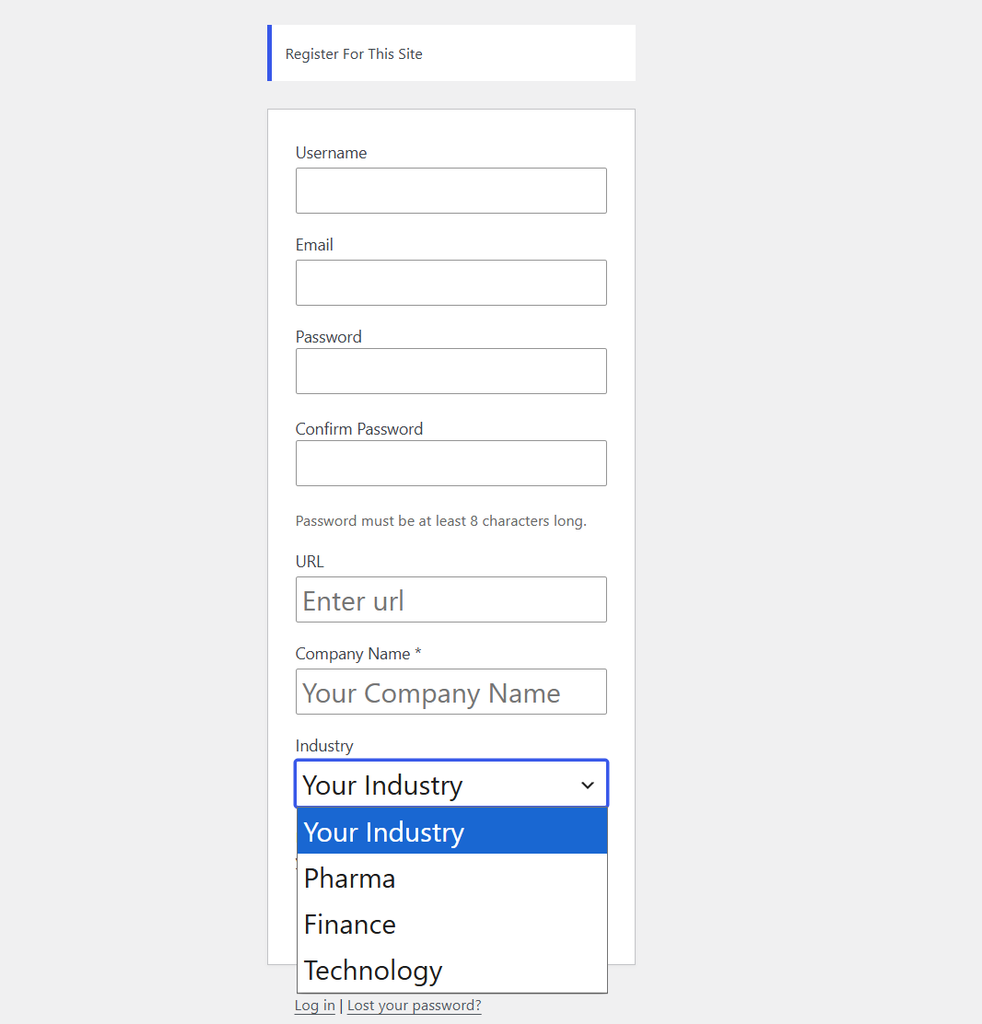
The option label is shown in the form. The value is the stored answer. Keep those values short and consistent. Choosing “Wholesale enquiries” here only records an answer; it does not automatically approve an account, change its role or unlock wholesale pricing.
5. Review the order and display settings
In the field list, drag your custom fields into the order you want. Core fields have their own restrictions, so do not expect to drag every native WordPress input wherever you like. Keep the new fields enabled.
Under Forms → Appearance → Display Settings, leave Show Field Labels on. A placeholder is not a replacement for a label because it disappears once someone starts typing. Enable descriptions only where they explain something useful.
The Layout Settings section includes layout, spacing and label-position controls. Start with a stacked layout and full-width fields for this example, then check the actual registration screen on a phone. The native screen is narrow, and an attractive dashboard configuration is not proof that a multi-column form will read well there.
Click the page-level Save Changes. Saving a field inside its dialog and saving the feature page are separate steps.
6. Test a complete registration
- Reload the registration URL in your private browser window.
- Confirm that Company name and the optional dropdown appear alongside the native registration fields.
- Try registering without Company name. The required-field check should stop the submission.
- Enter a company name within the 80-character limit, choose an interest and register with a new username and your test email address.
- Check the registration result and any email WordPress sends. Complete the password or verification step that your site currently requires.
- Return to Users → All Users and confirm that the test account exists with the intended role.
Swift Commerce saves custom registration answers as user metadata. Do not assume every answer will automatically appear as an editable field on WordPress’s standard user-profile screen, or that another CRM or membership plugin will read it without an integration.
If custom fields are missing while an access check is enabled, open Registration & Access → Access → Registration forms. Where both features apply to the same form, enable Registration Form controls fields, save and test again. Custom fields and the access check have separate switches.
What can you add with Pro?
You do not need Pro for the company-name example above. Pro adds support for WooCommerce registration locations and advanced registration features such as conditional rules, file uploads, role-assignment rules, redirects and a welcome email that you can edit with the built-in Email Customizer.
Add those only when there is a clear reason. A file-upload field, for example, needs sensible file restrictions and a real process for reviewing submissions. A custom role rule should never turn a visitor’s self-selected answer into administrator access.
For the full settings reference, see the Registration & Access documentation.
Questions about custom WordPress registration forms
Do I need to create a new WordPress page?
Not for this method. It extends the native form at wp-login.php?action=register. You can link to that address from your navigation or another page. Do not add an invented Swift Commerce registration shortcode to a blank page.
Can visitors choose their password in the custom field editor?
Do not add a second generic password field to replace a core password field. Check the enabled core fields in Forms → Fields and the field source in Access, then test the complete signup. When an access check controls password setup, the applicant creates their password during registration and signs in after completing that check.
Does a custom registration form verify emails or approve new users?
No. Collecting fields, verifying an email address and approving an account are different tasks. For a review-based registration process, follow our guide to requiring admin approval for WordPress registrations.
Will these changes affect every third-party signup form?
No. This guide targets WordPress’s native registration form. A page builder, membership plugin or external signup service may use its own form and submission process. Test that form separately instead of assuming the native integration covers it.
Once your test account registers successfully and the required fields behave correctly, repeat the checked settings on your live site. Keep the form focused on the information you actually need.
For the next setup task, see verifying WooCommerce customer emails.