


WooCommerce cart recovery emails should explain the reminder, show the relevant products and provide a working route back to checkout. This guide customizes that message and tests the email in Swift Commerce.
With Swift Commerce, you can edit the recovery message and its design in the built-in Email Customizer. This guide covers the basic reminder first, then explains what changes when you use a Pro email sequence.
Before customizing WooCommerce cart recovery emails
Make sure WooCommerce and Swift Commerce are active and Cart Recovery is enabled. You also need cart capture and reminder settings configured. If those aren’t in place yet, follow How to Recover Abandoned WooCommerce Carts with Email.
The basic cart recovery reminder and its email customization are available in Free. Pro adds automation sequences and other recovery controls. Designing the email doesn’t make an anonymous visitor’s address available; the cart must have an eligible captured email address before a reminder can be sent.
1. Open the cart recovery email
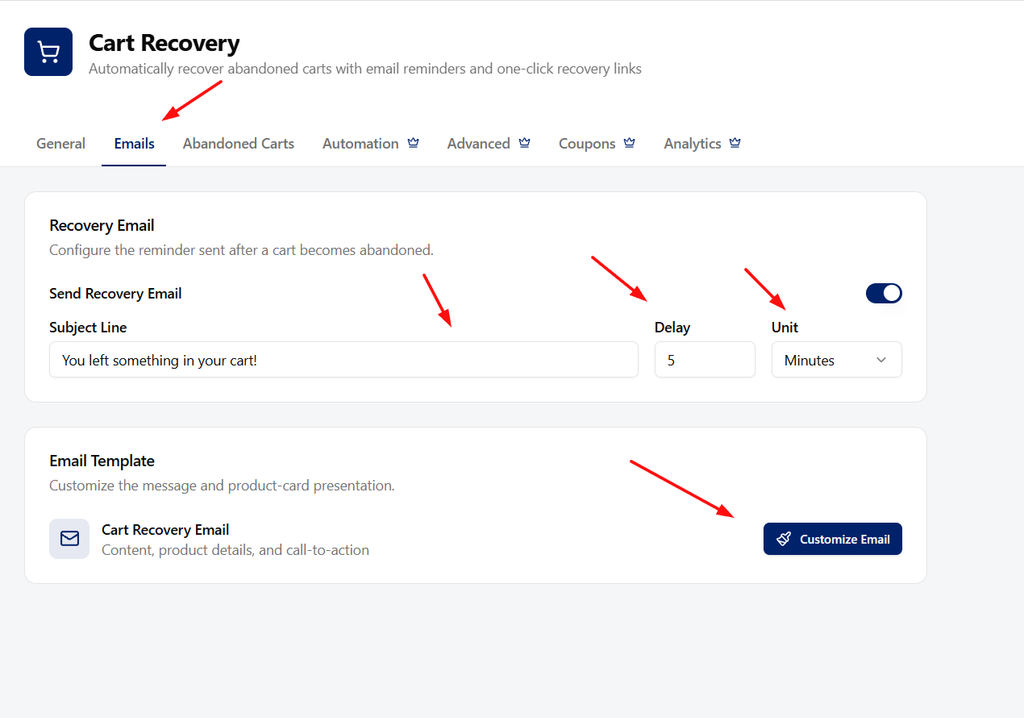
- In Swift Commerce, open Cart Recovery.
- Choose Emails.
- Under Recovery Email, enable Send Recovery Email if you want the reminder active.
- Review Subject Line, Delay, and Unit. You can choose Minutes, Hours, or Days.
- Under Email Template, find Cart Recovery Email and click Customize Email.
Timing and design are separate decisions. A useful message still needs an appropriate delay and a working recovery setup. Save any changes to the reminder settings with the feature’s Save Changes action.
2. Edit the subject, heading, and message
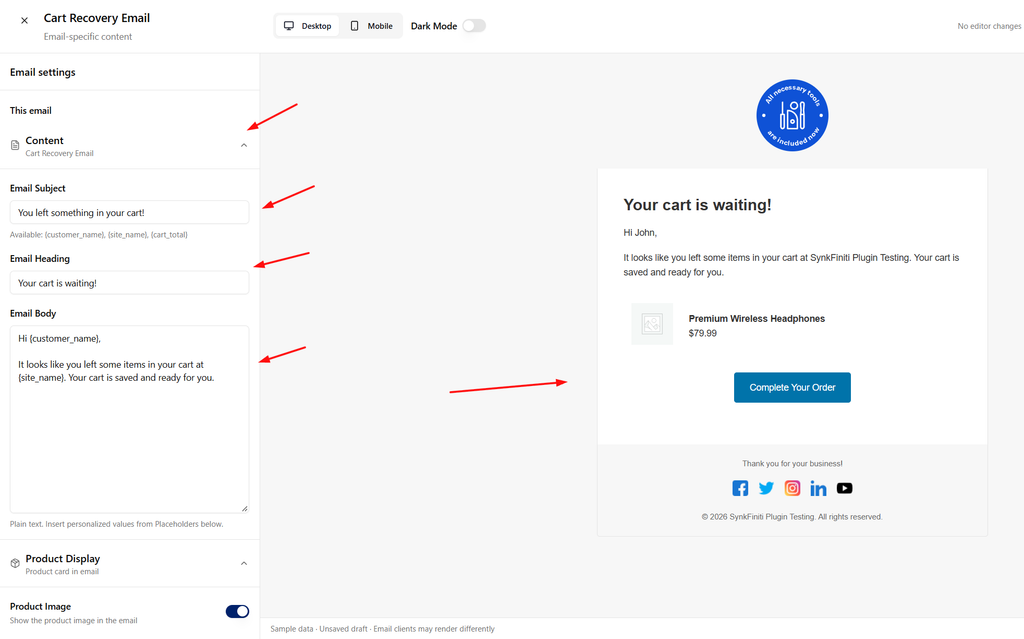
In the Email Customizer’s Content section, edit Email Subject, Email Heading, and Email Body.
The subject is what the customer sees in the inbox. The heading appears inside the email. They don’t have to repeat each other word for word.
For example:
- Email Subject: Your cart at {site_name} is still available
- Email Heading: Pick up where you left off
- Email Body:
Hi {customer_name},
You left a few items in your cart at {site_name}. If you’d like to continue, use the button below to return to your cart.
If you need help choosing, reply to this email.
Only invite replies if your store actually monitors the reply address. Don’t promise reserved stock, a discount, or an expiry time unless those statements match your store’s setup.
The body editor accepts plain text. Use the design controls for the visual styling rather than pasting a complete HTML email into the message field.
3. Use the supported placeholders
Open Placeholders to insert the values supported by this email. Keep their spelling and single braces intact.
| Placeholder | What it inserts |
|---|---|
{customer_name} | The customer’s first name, with “there” as the guest fallback. |
{customer_email} | The captured customer email address. |
{cart_total} | The cart total with its currency. |
{recovery_link} | The unique cart recovery URL. |
{unsubscribe_link} | The recovery-email opt-out URL. |
{site_name} | Your website name. |
{site_url} | Your website URL. |
For the subject, stick to the supported values shown by the subject hint, such as {customer_name}, {site_name}, and {cart_total}. Don’t substitute an order number: an abandoned cart may not have a WooCommerce order yet.
Keep the recovery button connected to the generated recovery link. Replacing it with a generic checkout URL can remove the behavior that restores the customer’s cart. Keep the opt-out available too.
4. Choose which product details appear
In the product-display controls, decide whether to show the product image, title, and price. Set Button Text to a clear action such as Return to your cart or Complete your order.
Showing the product details helps explain why the customer received the message. Check longer product names and mobile layouts so the button doesn’t get lost underneath a large product image.
The products and prices in the editor are samples. They help you review the design; the real message uses the relevant cart information.
5. Apply your email branding
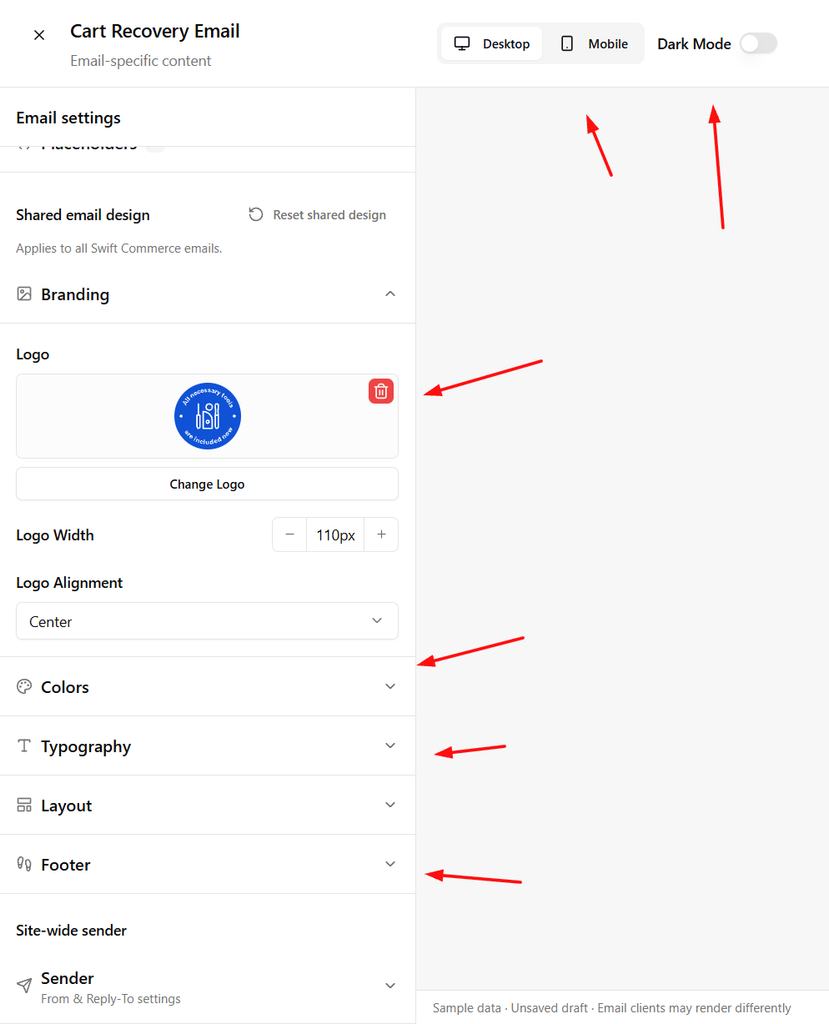
Use the available branding, colors, typography, layout, and footer sections to match your store. Add a readable logo, keep the main button recognizable, and use enough contrast for the body text.
These design settings are shared across supported Swift Commerce emails. Changing shared branding can affect other email types, not only cart recovery. Check another email preview if you’re making a major design change.
Use Desktop and Mobile to review the layout. Dark Mode simulates a dark preview; it doesn’t force every recipient’s email app to render the message that way.
6. Save and send a test
- Click Save Changes inside the Email Customizer and wait for confirmation.
- Use Send test to send a test to an address you control.
- Check the subject, body, image sizing, button label, footer, and opt-out presentation in the inbox.
- Close the editor, reopen the template, and confirm the saved content is still there.
- If you changed the reminder toggle, delay, or other feature settings, save those in the Cart Recovery page too.
A test email checks delivery and presentation. It doesn’t prove that a live customer’s captured cart, recovery token, scheduling, and checkout all work. Run a controlled abandoned-cart test with your own email address before relying on the reminder.
What changes when you’re using Pro Automation?
In Automation, Pro lets you configure a sequence of up to five recovery emails with their own subjects and delays. The recovery template’s heading, body, and product-card settings are shared; don’t assume each sequence entry has an entirely separate body design.
If you use coupons, configure the coupon behavior before promising a discount in the copy. Changing coupon styling in the customizer is not the same as creating a valid offer.
Unpaid-order reminders are a separate message type. Customize that template separately instead of using cart-recovery placeholders as if an unpaid order and an abandoned cart were the same thing.
If a reminder isn’t arriving
First check that the reminder is enabled and the cart has a usable captured email address. Then check the abandonment threshold, the email delay, scheduled background work, and your WordPress mail delivery. Look in spam too. A design preview alone doesn’t verify any of those steps.
Keep the message specific and helpful. The Cart Recovery documentation covers the rest of the setup.
Check the Swift Commerce listing on WordPress.org for Free installation requirements and downloads.
For the next setup task, see Cart Recovery capabilities, the shared Email Customizer.