


To recover abandoned WooCommerce carts, give customers a recognizable reminder and a working link back to their saved products. This guide configures Swift Commerce email timing and tests the full return-to-checkout path.
This guide sets up Swift Commerce Cart Recovery. We will configure cart tracking, create one reminder, customize its email and test recovery through a paid order. One recovery email is available in Free. Pro adds multi-email automation, coupon options and further controls.
Before trying to recover abandoned WooCommerce carts
- Install and activate WooCommerce and Swift Commerce.
- Confirm Cart and Checkout pages work and a test customer can place an order.
- Use staging and an email inbox you control for the first test.
- Check your transactional-email or SMTP setup so WordPress can deliver messages.
- Review how you explain recovery emails, collect addresses and handle opt-outs for your audience. Entering an address should not be treated as unrestricted permission for unrelated marketing.
Do not test by capturing real customers’ abandoned carts and repeatedly sending to them. Use a fresh test session and your own address. If another recovery service is active, pause overlapping test automations so the same customer does not receive two sequences.
1. Enable Cart Recovery
- Open Swift Commerce → Sales Recovery → Cart Recovery.
- Turn on the feature using the header switch.
- Click Save Changes.
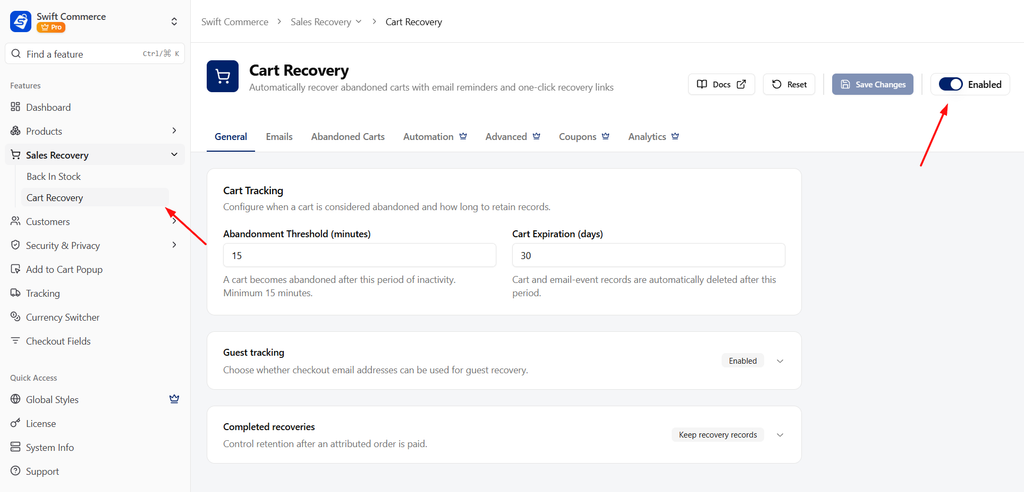
The feature needs a recoverable cart and a known email address. It cannot email an anonymous visitor who only browses or adds a product without providing an address.
2. Configure abandonment and retention
In General → Cart Tracking, review:
- Abandonment Threshold (minutes): the inactivity period before a cart is considered abandoned. Use 60 minutes as a reasonable starting example, not a mandatory value.
- Cart Expiration (days): how long cart and email-event records are retained. Choose a period that fits your store’s follow-up and retention needs.
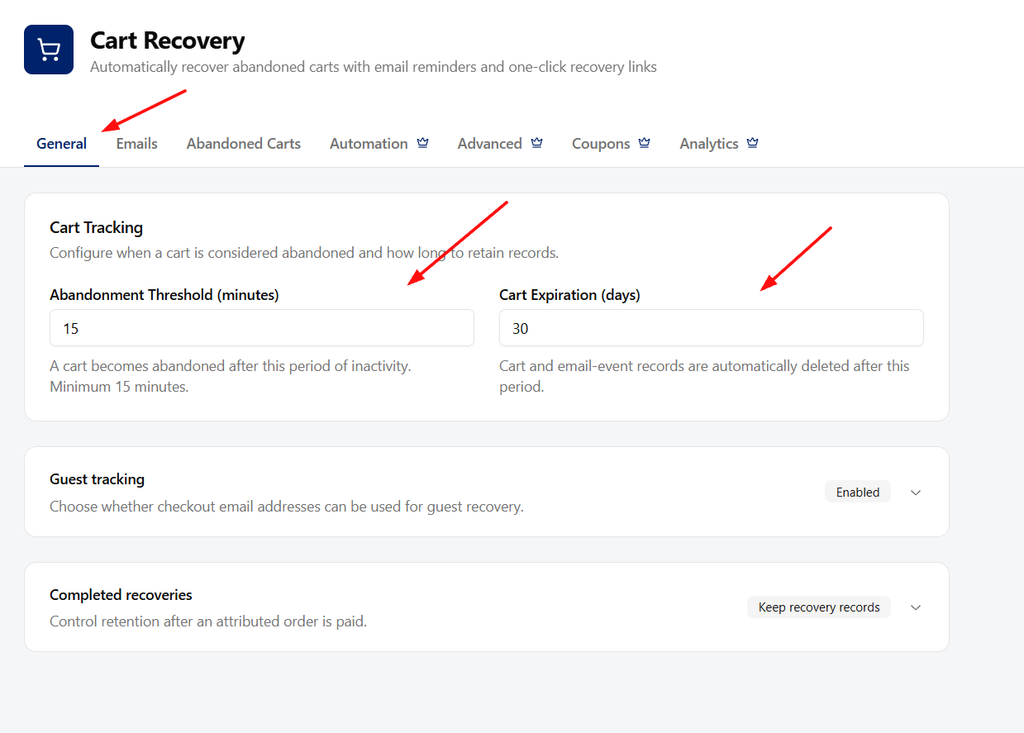
The abandonment threshold and the email delay are separate. A 60-minute threshold plus a 60-minute first-email delay is not an email sent 60 minutes after the customer’s last action. The cart must first be marked abandoned; the reminder becomes due after its configured delay from that point.
Expand Guest tracking. Enable Track Guest Carts if you want to capture the billing email a guest enters during checkout. That does not identify every visitor to the shop. A logged-in customer and a guest checkout are worth testing separately.
Under Completed recoveries, review Delete Cart on Recovery. Leave it disabled if you want to retain the recovery record for reporting, subject to your retention settings. Save Changes.
3. Enable the first recovery email
- Open Emails.
- Turn on Send Recovery Email.
- Set the Subject Line, for example Your cart at {site_name} is waiting.
- Set Delay to 60 and Unit to Minutes for this example.
- Save Changes.
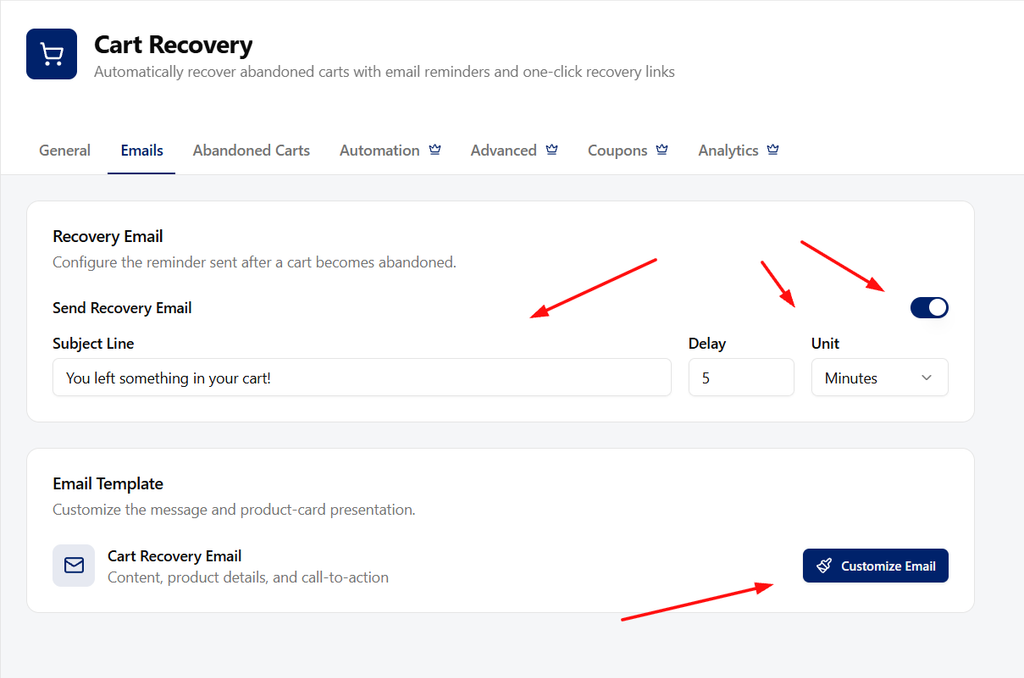
Choose a delay that gives someone time to finish the purchase naturally. If you use Pro automation for later messages, check each interval: later delays are measured from the preceding sent email, not all from the original cart visit. Do not accidentally stack several reminders much closer together than intended.
4. Customize the message and product display
- In Emails, find Email Template.
- Click Customize Email beside Cart Recovery Email.
- Edit the heading and body in the built-in Email Customizer.
- Review the product details and button label.
- Save Changes in the customizer.
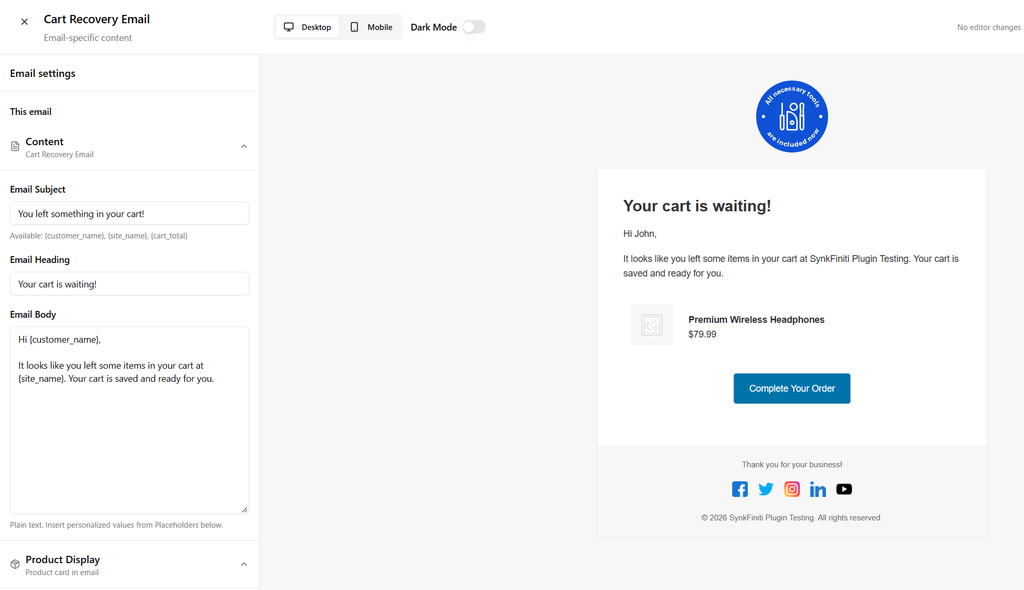
A simple body can be enough:
Hi {customer_name},
You left some items in your cart at {site_name}. If you still want them, use the button below to return to your cart. You can review the current prices and availability before checking out.
Keep the recovery button focused on returning to the cart. Do not replace its destination with a generic homepage link. The generated recovery URL belongs to the specific cart; the correct product and variation selections matter.
Use only the available placeholders, such as {customer_name}, {customer_email}, {cart_total}, {recovery_link}, {unsubscribe_link}, {site_name} and {site_url}. The name may fall back to a generic greeting for a guest. Check the result rather than assuming every captured cart contains a first name.
Review the unsubscribe action in the delivered message and make sure it works. Do not remove or obscure it while editing the template.
5. Review shared branding and send a test
In the Email Customizer, review the logo, colors, typography, layout and footer. These design settings are shared across supported Swift Commerce emails, not limited to cart recovery.
- Check the Desktop and Mobile previews.
- Save the customizer changes.
- Use Send test email to send to your own inbox.
- Inspect the delivered message, including the From address and mobile layout.
- Save any remaining settings changes on the Cart Recovery page.
A test email checks the template and delivery path, but it does not prove that a real abandoned cart will be captured or restored. Sample links and product data are not a replacement for the next test.
6. Create a real test abandonment
- Open a fresh private browser window on staging.
- Add an in-stock test product to the cart.
- Go to checkout and enter an email address you control. If testing a guest, make sure guest tracking is enabled.
- Wait for the checkout email capture to complete, then leave without placing the order.
- Do not keep revisiting or changing the same cart, because activity can restart abandonment timing.
- Open Cart Recovery → Abandoned Carts in your admin session and check that the cart was captured.
- Allow the threshold, email delay and background processing time to pass.
For a faster staging test, the threshold has a minimum of 15 minutes and the email delay can be set in minutes. Change these only for your controlled test and restore the intended live values afterwards.
Reminders depend on scheduled background work. Default WP-Cron runs in response to page loads, so a quiet or restricted staging site may not process due tasks at the exact minute. If the reminder is late, check scheduled tasks and email delivery logs before reducing every delay.
7. Test the recovery link through a paid order
- Open the actual reminder that arrived for your test cart.
- Click its recovery action in a separate test browser session.
- Confirm the correct products, variations and quantities are restored.
- Review current stock, prices, coupons, shipping and tax.
- Complete a sandbox payment.
- Check the resulting WooCommerce order and the cart-recovery record.
Opening a link is not the same as recovering revenue. An order still awaiting payment is not a paid recovery. Swift Commerce’s recovery attribution distinguishes the return and order stages from payment, so check the final status rather than counting every click as a sale.
Also test the opposite case: a customer completes checkout before a reminder is due. That purchase should not continue through the same abandoned-cart follow-up as though the cart were still unfinished. Test the unsubscribe link separately with your own address and confirm further recovery emails stop.
8. Add a sequence or coupon only if you need one
Once the single reminder works, Pro’s Automation tab lets you configure additional emails and supported coupon offers. Start with a short sequence and review the total time between messages. If you offer a coupon, test its actual discount and expiry at checkout.
Unpaid-order reminders are a separate flow from a cart that never became an order. Do not enable both without checking how they interact with your payment and follow-up process.
Frequently asked questions
Can I recover a cart without an email address?
Not by sending an email. The store needs a known address tied to the cart. A product visit alone does not provide that.
Does the recovery link reserve the stock or original price?
No. Review current availability and totals when the customer returns. Avoid promising a price or reservation that your store does not actually honor.
Do I need to offer a discount?
No. Start with a helpful reminder and a working return link. Add a Pro coupon offer only if it fits the purchase and your margins.
See the Cart Recovery documentation for the remaining automation, retention and reporting settings.
For the next setup task, see customizing the cart recovery email.