


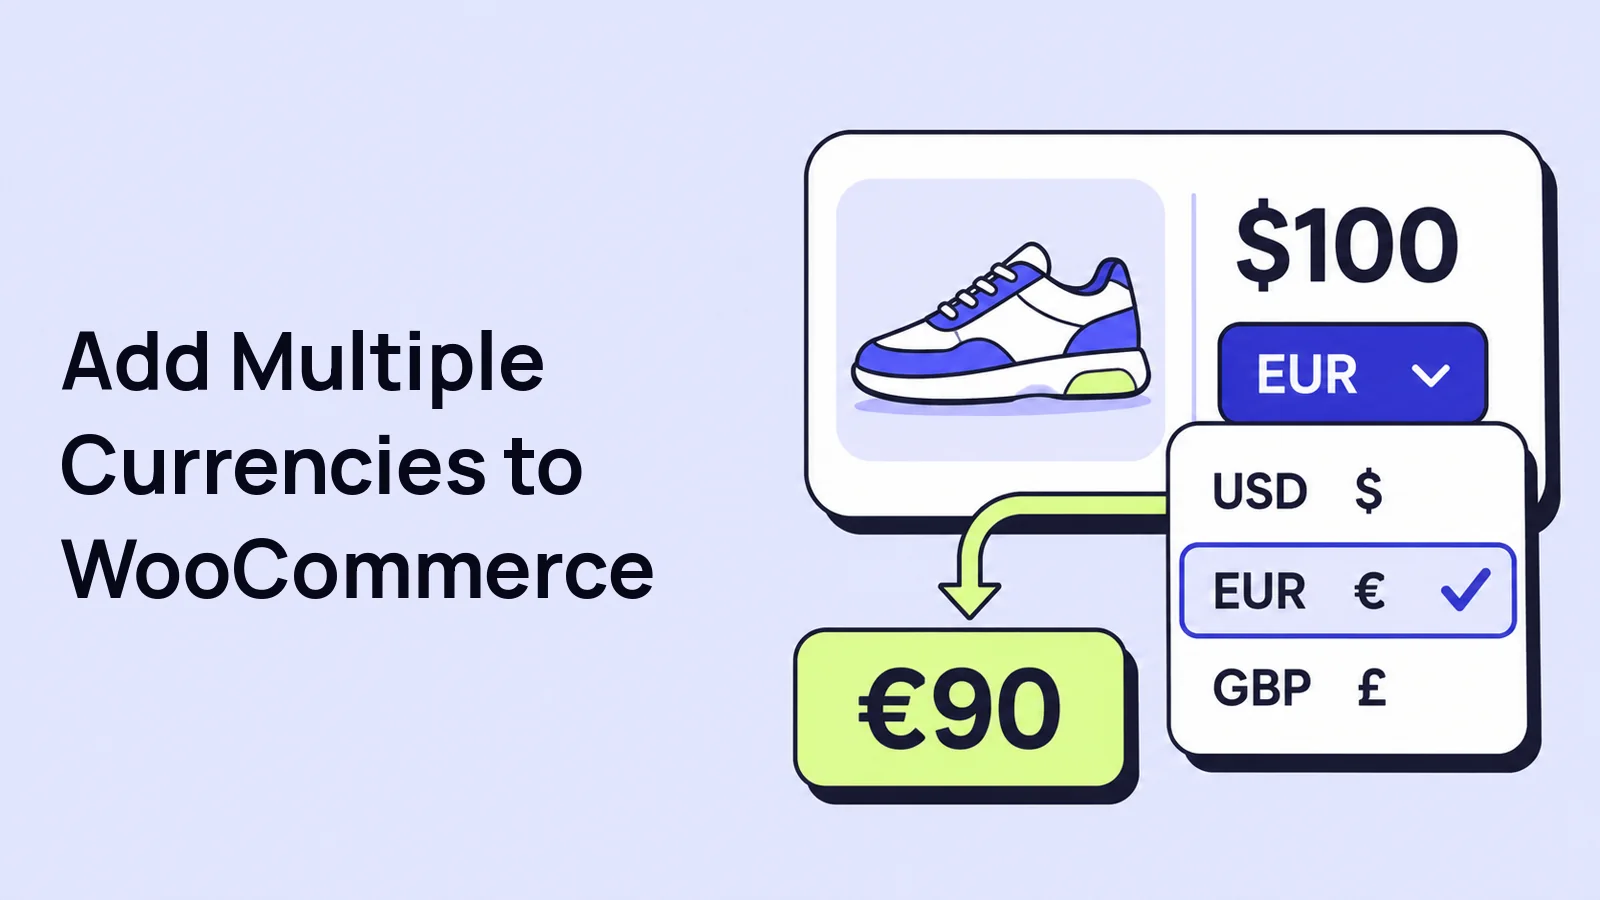
Multiple currencies let shoppers browse WooCommerce prices in a familiar currency. This guide configures the Swift Commerce switcher and checks exchange rates, product prices and checkout totals.
This walkthrough uses Swift Commerce Currency Switcher. We will keep USD as the example store currency, add EUR and GBP, enter clear conversion rates and display a switcher. We will also check the cart and checkout, because showing a converted price is not enough to prove a payment gateway accepts that currency.
Before adding multiple currencies to WooCommerce
- Install and activate WooCommerce and Swift Commerce.
- Use a staging copy of an existing store for the first configuration and payment tests.
- Confirm the currency in which your catalog prices were entered.
- Check which currencies your actual payment gateway and merchant account support.
- Avoid running two currency-conversion plugins on the same staging test.
Our numbers are examples, not current exchange rates. We will use 1 USD = 0.90 EUR and 1 USD = 0.80 GBP. Replace them with rates appropriate to your store. The steps below use explicit fixed rates so you can verify the calculation without depending on an external update schedule.
1. Confirm the WooCommerce store currency
- Open WooCommerce → Settings → General.
- Find Currency options and confirm your store currency.
- If your catalog is already priced in USD, keep USD for this example.
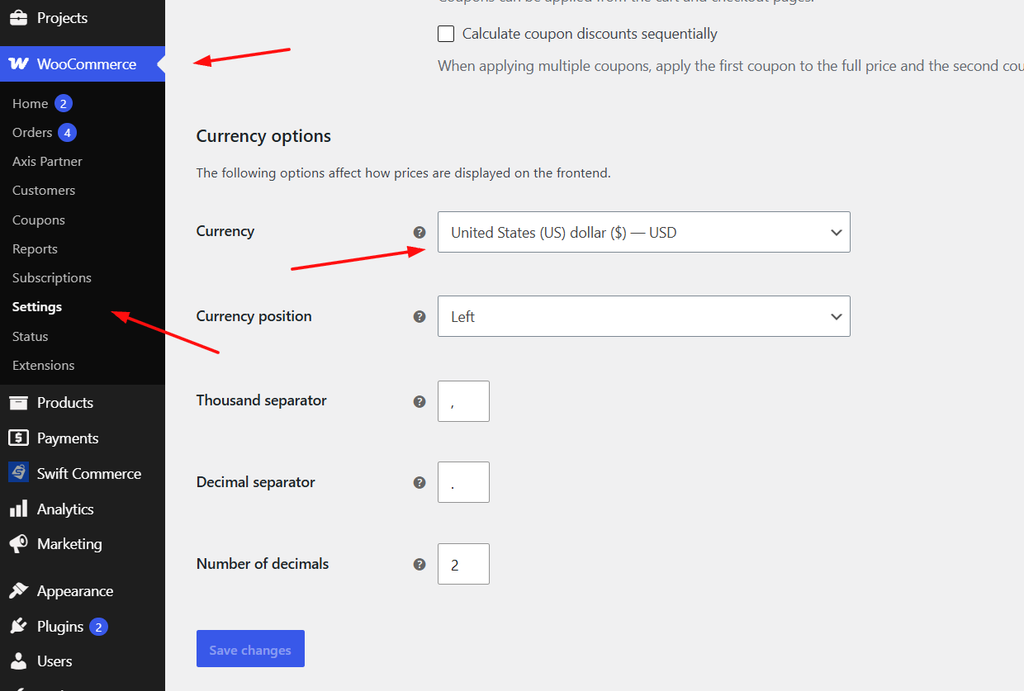
Do not change the WooCommerce currency just to add a display choice. Changing a currency label is not a conversion of all the numbers already stored in your catalog. If your store uses another base currency, keep that currency and calculate your additional rates from it.
2. Enable Currency Switcher
- Open Swift Commerce → Currency Switcher.
- Enable the feature using its header switch.
- Click Save Changes.
- Open the Currencies tab and locate the row labeled Store currency.
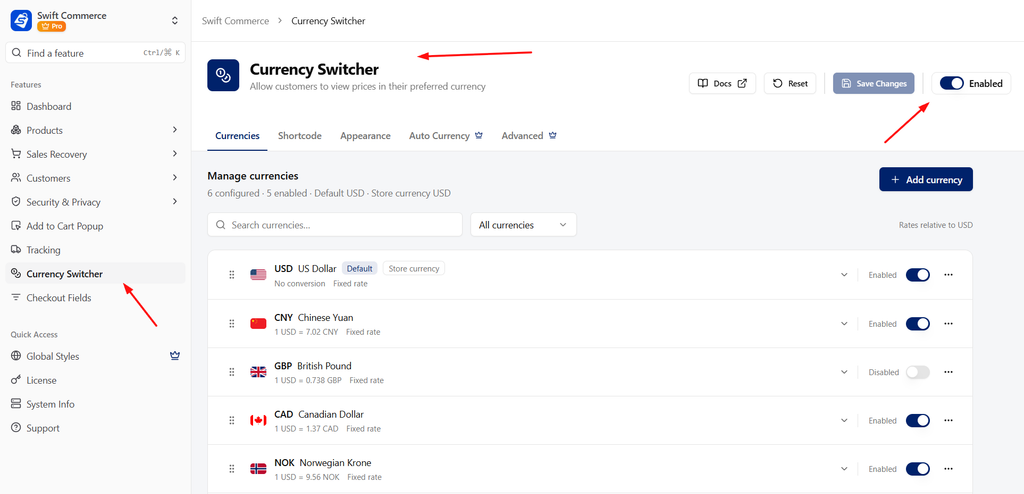
Keep the store/base currency and its Default setting unchanged for this first setup. We are adding choices for customers, not re-denominating the business’s catalog.
3. Add your additional currencies
- Click Add currency.
- Search for EUR or Euro in the currency picker.
- Select it and click Add EUR.
- Repeat for GBP.
- Confirm that the new currency rows are enabled.
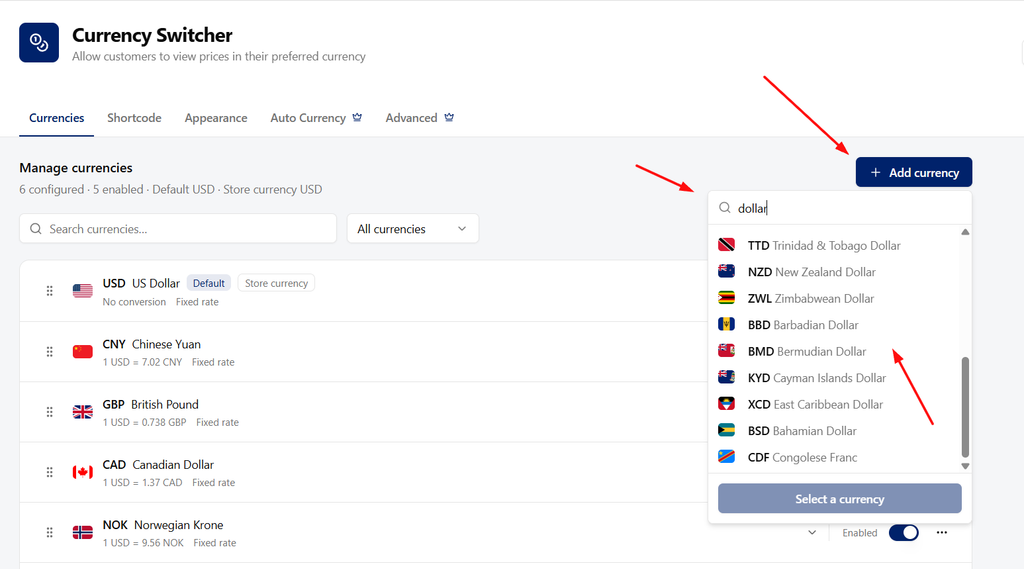
The picker contains currencies by code and name. Start with the markets you actually serve instead of adding every currency at once. A long list is harder to navigate and creates more combinations to test.
Adding a currency may fetch an initial rate. Review the resulting number yourself; do not leave a value of 1 simply because a fetch did not finish. Adding a currency once is also not proof that its rate will keep updating automatically.
4. Enter and verify the conversion rates
- Expand the EUR row using its chevron.
- Under Exchange rate, set Rate source to Fixed rate.
- Enter 0.90 in Exchange rate for our USD-to-EUR example.
- Leave the Conversion fee at 0 and Rounding method at No rounding for this first check.
- Expand GBP, select Fixed rate and enter 0.80.
- Click Save Changes.
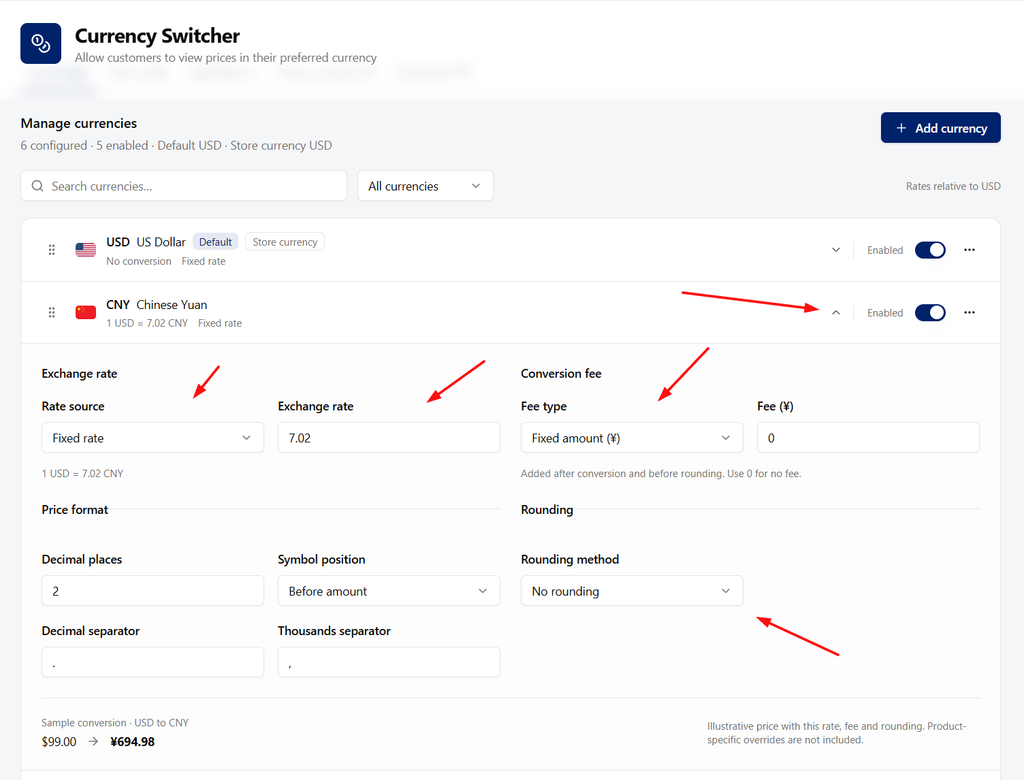
Read the conversion statement beneath the rate. With USD as the base, 0.90 means one US dollar converts to 0.90 euros. Entering the inverse rate would give the wrong prices.
A $100 product should therefore show €90 or £80 before differences caused by tax display or other pricing rules. Use a known test product to check this calculation, rather than judging only from the symbol.
5. Set the currency format
Each expanded currency row has a Price format section. Review Decimal places, Symbol position, Decimal separator and Thousands separator. Choose conventions your customers recognize and keep them consistent with the currency.
The sample conversion beneath the controls helps you check formatting and the configured rate. It does not include every product-specific override. If you later enable a conversion fee or rounding, check a low-priced product as well as a high-priced one; a fixed fee has a much larger effect on a cheap item.
If you use Pro’s per-product currency prices, check those separately under the product’s Currency Prices panel. An explicit price can bypass the normal rate calculation for that product. Leave those overrides out of the first test unless you deliberately need them.
6. Put the currency switcher on the storefront
- Open the feature’s Shortcode tab.
- Copy
[swift_commerce_currency_switcher]. - Edit a suitable WordPress page and add a Shortcode block.
- Paste the shortcode, save the page and view its front end.
[swift_commerce_currency_switcher]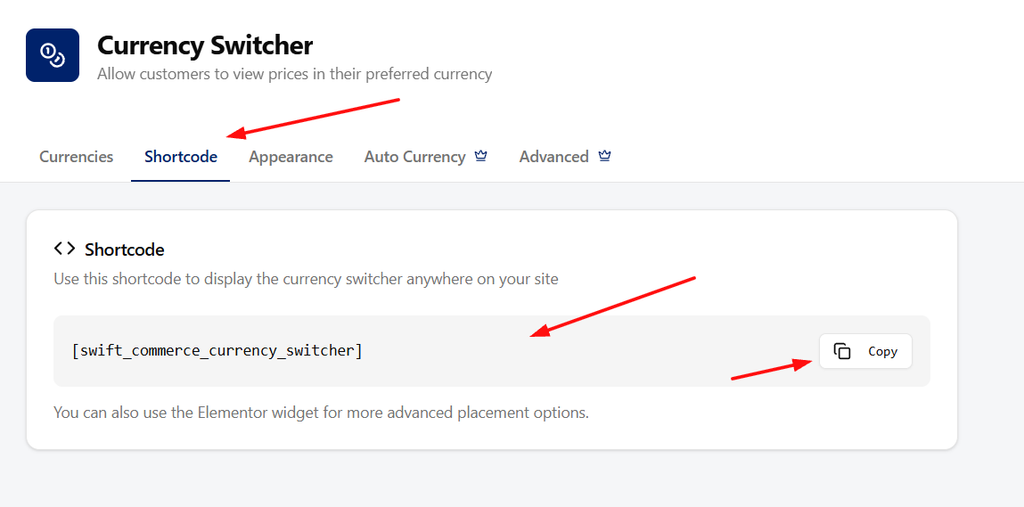
A Shortcode block renders the control; a Code block would only display the text. If you want it in the header, place the shortcode through a template part or builder element that supports it. Check the actual saved header rather than only the editor preview.
Use the Appearance tab to review its design. Make the current currency code visible where possible, especially if several currencies use the same dollar symbol. After saving, check that the switcher fits on a phone screen and that all enabled choices can be selected.
7. Check the cart, checkout and payment currency
- Open a private browser window and visit the page with the switcher.
- Choose EUR and open the $100 test product.
- Confirm the displayed amount follows your configured rate.
- Add the product to the cart and inspect line prices, shipping, discounts and taxes.
- Continue to checkout and check both the amount and the currency.
- Use a sandbox payment and inspect the WooCommerce order and gateway transaction.
- Repeat in GBP, then switch back to the store currency.
Do not tell customers they can pay in a currency until you have verified that exact checkout and gateway combination. A gateway may reject a currency, convert it through its own service or settle funds in a different currency. Settlement is not the same thing as the currency displayed to the shopper.
If one visitor’s selected currency appears for another visitor, review your page-cache/CDN configuration. The cache needs to respect currency selection. Also test variable-product prices, coupons and other extensions you actually use; a successful simple-product test does not cover every pricing integration.
Frequently asked questions
Do I have to enter separate prices for every product?
Not for rate-based conversion. The switcher can calculate prices from your base prices and configured rates. Use Pro’s product-specific currency prices only when you intentionally want an explicit amount for a product.
Will a fixed rate change with the market?
No. A fixed rate is a value you manage. Review it periodically and update it when needed. Do not confuse an initial fetched rate with a verified scheduled rate-update setup.
Does switching currencies translate the store?
No. Changing prices and currency formatting is separate from translating product descriptions, navigation or checkout text.
For the remaining display and advanced settings, see the Currency Switcher documentation.
Check the Swift Commerce listing on WordPress.org for Free installation requirements and downloads.
For the next setup task, see adjusting currency conversion fees.