


WooCommerce back-in-stock emails should name the returned product and give the customer a useful link to it. This guide customizes the message and shared branding in Swift Commerce, then tests a restock notification.
Swift Commerce includes an Email Customizer for its supported notifications. In this guide, we will use it to edit the back-in-stock notification, review the confirmation email and test both the design and the real restock flow.
Before customizing WooCommerce back-in-stock emails
If customers cannot yet join a stock-notification list, start with How to Add Back-in-Stock Notifications to WooCommerce. That guide covers enabling the feature, showing the form and testing a signup. Customizing an email does not create the signup form or a restock event by itself.
You will need WooCommerce, Swift Commerce, an out-of-stock test product and an inbox you control. Use staging or a dedicated test product with no real subscribers. Restocking a live item can trigger messages to people already waiting for it.
1. Open the correct email template
- Go to Swift Commerce → Sales Recovery → Back In Stock.
- Open Notifications.
- Select the Email Settings subtab.
- Under Email Templates, find Notification Email.
- Click its Customize Email button.
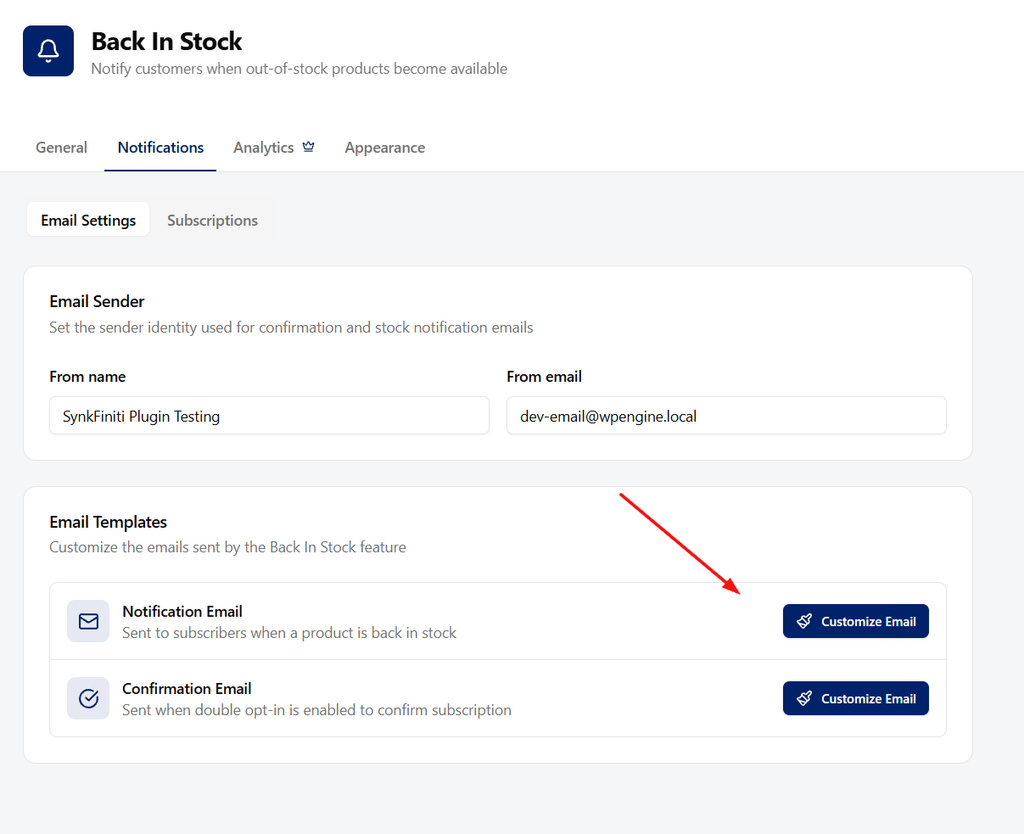
There are two different messages here. Notification Email tells subscribers that stock has returned. Confirmation Email asks them to confirm the request when email confirmation is enabled. Edit the notification first so you do not accidentally put “back in stock” wording into a signup-confirmation message.
2. Write the subject, heading and body
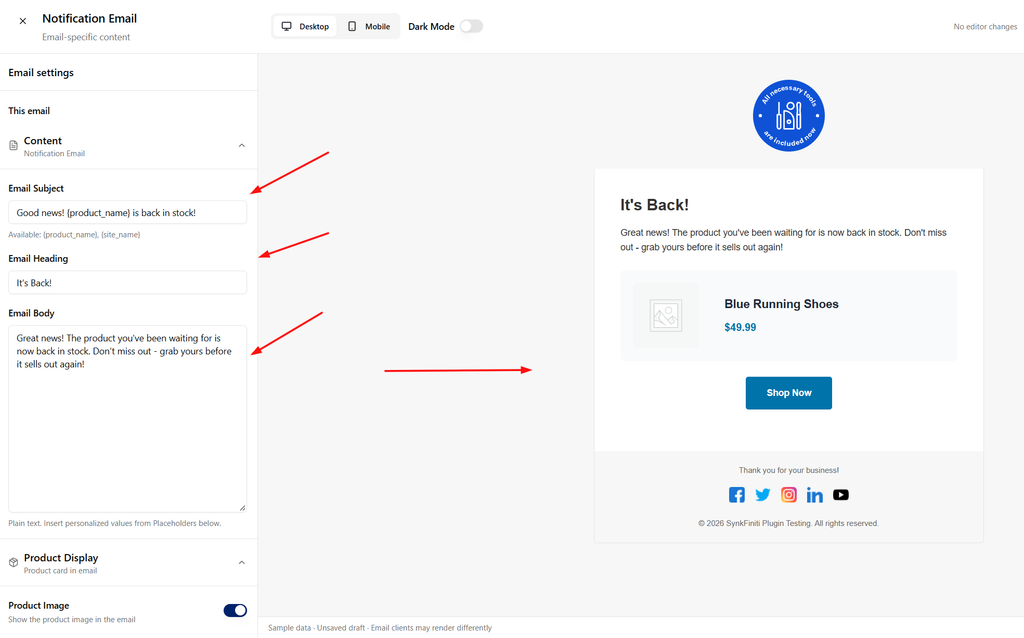
In the customizer’s Content section, edit the supported content fields. Keep the subject specific and the body short enough that the product and purchase link remain easy to find.
For example, an apparel store could use:
- Subject: {product_name} is back in stock at {site_name}
- Heading: Back in stock
- Body: You asked us to let you know when {product_name} returned. It is available again. View the product below to check the current price and availability.
Those are example words you can adapt. Avoid invented urgency, such as “only two left,” unless the message is actually using reliable current inventory data. A restock notification is not a reservation, so do not promise that stock is being held for the recipient.
Use the customizer’s placeholder picker instead of inventing tags. Supported back-in-stock placeholders include {product_name}, {product_price}, {product_url}, {customer_email}, {site_name} and {site_url}. Keep the braces and spelling intact. There is no need to hard-code a product name that should change for each notification.
3. Choose the product details and button label
- Open the product-display controls in the customizer.
- Review whether to show the product image, title and price.
- Set Button Text to a clear action, such as View product.
- Check the sample preview for balance and readability.
For this message, showing the image and title usually helps the customer recognize what they requested. The price can help too, but it is the current product price when the notification is built, not a promise of the price they saw when they joined the list.
The product card uses the actual subscribed product in a real notification. The preview’s sample product is there to show the layout; it is not your test subscriber’s cart or a live purchase.
4. Apply your branding carefully
Under Shared email design, review the logo, colors, typography, layout and footer. Upload or select your real logo, keep the main text readable and make the action button easy to identify.
These design settings apply across supported Swift Commerce emails. Changing a notification’s subject or body is specific to that email, but changing shared branding can affect subscription, verification, recovery and other supported messages too. Check another email type before saving a major design change.
Use the design controls available in your edition. You do not need to change every setting to make an email recognizable. A clear logo, readable type and one obvious action are a good starting point.
5. Check the sender identity
- Close the customizer after saving any changes you want to keep.
- In Notifications → Email Settings, review Email Sender.
- Set From name to a recognizable store name.
- Set From email to an address on a domain your email delivery service is configured to send from.
- Save any remaining Back In Stock settings changes.
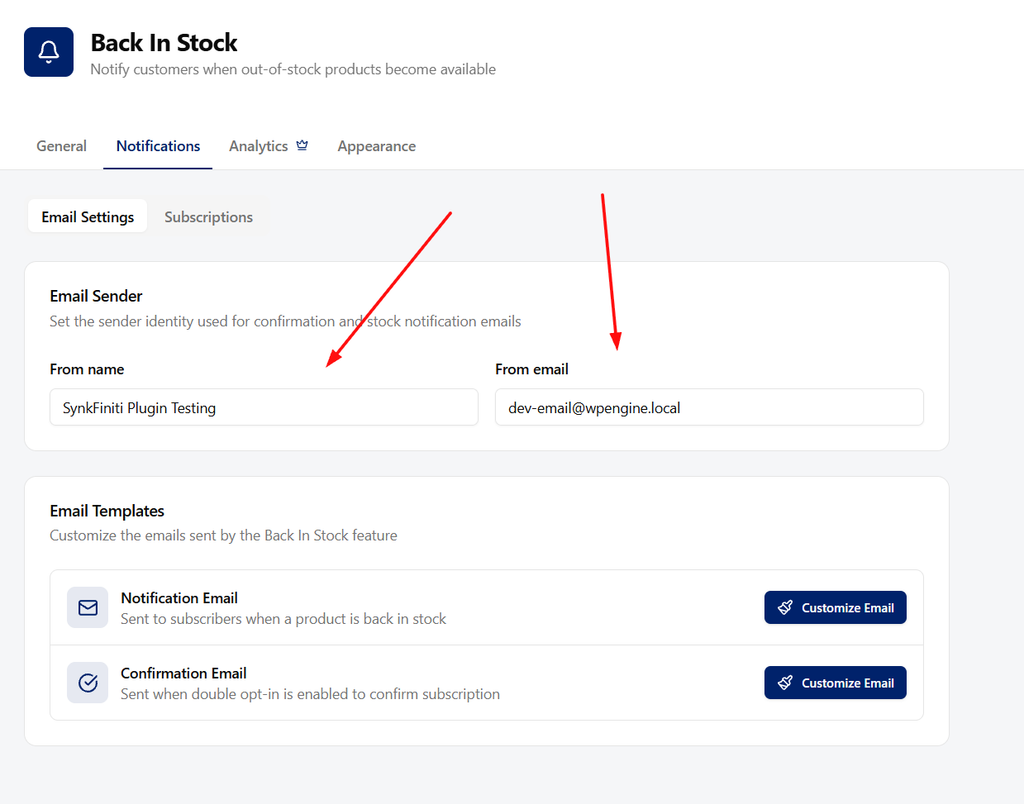
The customizer also has site-wide sender settings. Do not assume a sender change is isolated to this notification. Inspect the actual From address in a delivered test, especially if your SMTP or transactional-email service rewrites it. A display name alone does not authenticate your sending domain.
6. Review the confirmation email separately
If you use Require email confirmation in the feature’s General tab, return to Notifications and click Customize Email beside Confirmation Email.
Its job is to confirm ownership of the email address before the request becomes eligible for a notification. Use wording such as “Confirm your stock notification request,” not “Your item is back.” Keep the confirmation action intact and test its link. Do not paste an invented confirmation placeholder into the body.
If email confirmation is disabled, editing this template does not enable it. That behavior is controlled by the General settings, not the email’s wording.
7. Save and send yourself a test
- Review the Desktop and Mobile previews.
- Use Dark Mode to inspect the simulated darker presentation.
- Click Save Changes in the customizer.
- Use Send test email and enter an inbox you control.
- Open the delivered email and inspect the subject, logo, text, product card and button.
A successful test submission is not proof of inbox delivery. Check the inbox and spam folder. If nothing arrives, inspect your mail service’s delivery logs. Also remember that email clients can render colors and spacing differently; the dark-mode preview is a simulation, not a guarantee for every client.
8. Test a real notification on staging
- Open your out-of-stock test product as a customer and join its notification list with your own email address.
- If confirmation is required, open the confirmation email and complete the action.
- Check the request in Notifications → Subscriptions.
- Restock the correct product or variation and meet the configured Minimum stock to notify.
- Allow the notification queue and scheduled tasks to run.
- Open the resulting email and verify the real product details and destination link.
This final check proves more than the sample email: it checks the subscriber, confirmation state, stock trigger and saved template together. If it does not send, check those conditions and scheduled background tasks before repeatedly restocking a product.
Keep the Back In Stock documentation handy for the remaining form and notification rules.
Check the Swift Commerce listing on WordPress.org for Free installation requirements and downloads.