


A wishlist gives customers a place to keep products they are not ready to buy. That might be a shortlist of furniture, a gift idea or a product they want to compare later.
In this guide, we will add a wishlist to WooCommerce using Swift Commerce Wishlist. We will check the wishlist page, place the product buttons and test saving and removing items. The basic wishlist is available in Free; multiple wishlists and additional email capabilities are Pro options.
Before adding a wishlist to WooCommerce
Install and activate WooCommerce and Swift Commerce. If needed, go to Plugins → Add New Plugin, search for Swift Commerce, install it and activate it. Have a published product ready to use for the test.
If another wishlist plugin is already active, test this setup on staging first. Two sets of save buttons are confusing for customers and make it harder to check which wishlist contains an item.
1. Enable Wishlist
- Open Swift Commerce → Products → Wishlist.
- Turn on the feature using the header switch.
- Click Save Changes.
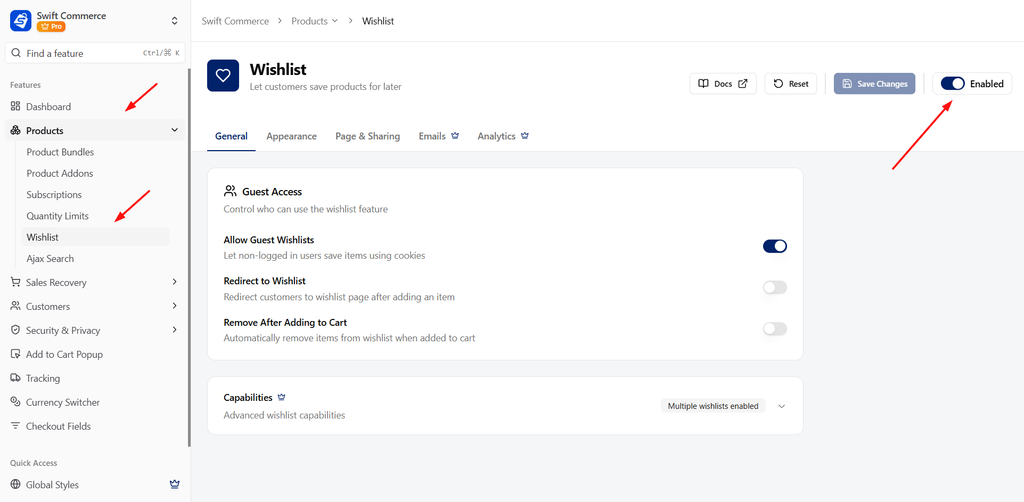
The wishlist needs both a save button and a page where customers can view their saved products. Check both before calling the setup finished.
2. Check or create the wishlist page
- Open the Page & Sharing tab.
- Find Select Wishlist Page.
- Check whether an existing Wishlist page is selected.
- Open that page on the front end and confirm it displays the wishlist rather than plain shortcode text.
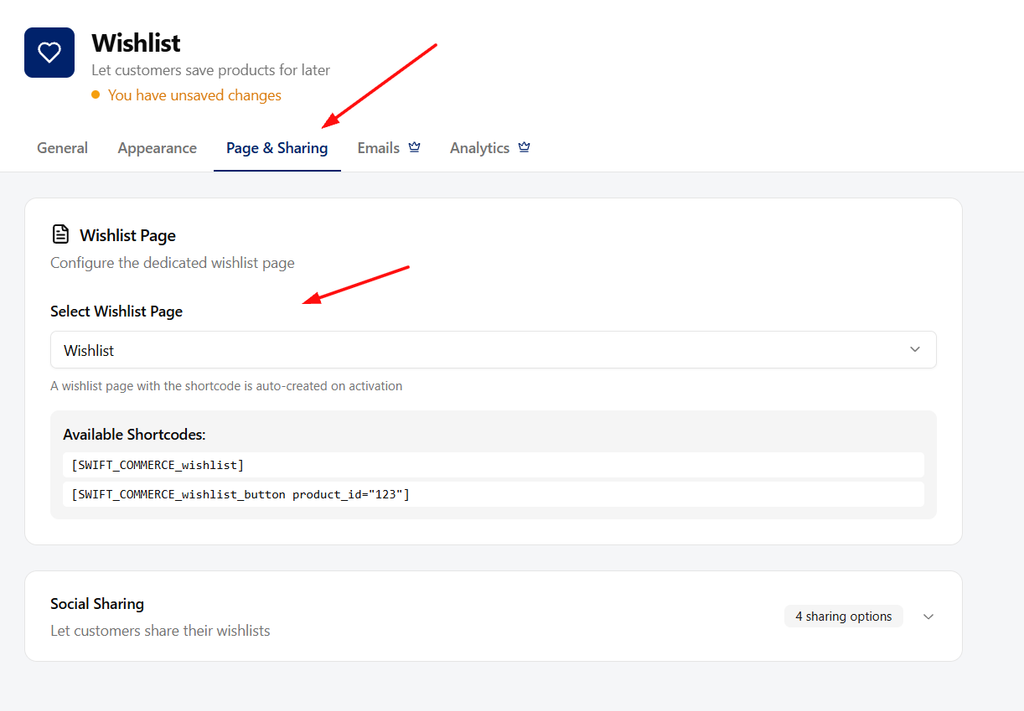
Swift Commerce can create a Wishlist page automatically. If you already have one, use it rather than creating duplicates. If no usable page exists, go to Pages → Add New, name it Wishlist and add a Shortcode block containing:
[swift_commerce_wishlist]Publish the page, return to Page & Sharing, select it under Select Wishlist Page and save. Reload the feature settings if the newly published page is not yet in the dropdown.
Use a Shortcode block, not a Code block. Selecting a normal empty page in the settings does not insert the wishlist content into it.
3. Decide whether guests can save products
In the General tab, review Allow Guest Wishlists. Turn it on if people should be able to save items before creating an account.
Guest wishlists rely on browser cookies. They are not an account-based promise of permanent storage across every device. Clearing browser data or using a different browser can change what the guest sees. Test in a private window if you want to check the logged-out experience.
Also review Remove After Adding to Cart. Enable it if adding an item to the cart should remove it from the wishlist. Leave it disabled if customers should be able to keep it saved for a later purchase too. Save your choices.
4. Place and label the save button
- Open Appearance.
- Select Button in the preview-type navigation.
- Expand Button Style.
- Review Display Style, Icon and Position.
- Set clear labels in Add Text and Remove Text, such as “Add to wishlist” and “Remove from wishlist.”
- Save Changes and open a real product page.
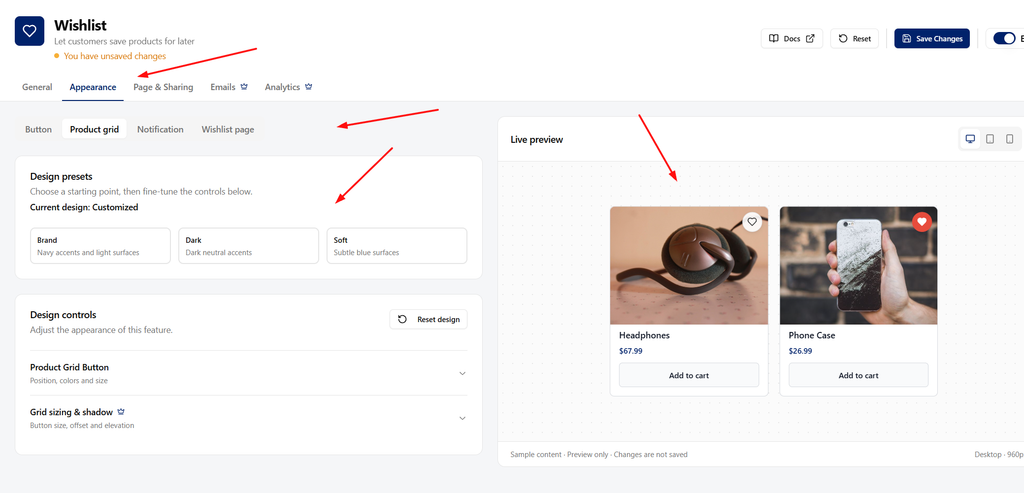
Choose a position near the buying controls without making the wishlist button look more important than Add to cart. Use the available settings in your edition; some design and sizing controls are Pro-only.
To show save buttons in the product grid, switch the Appearance preview to Product grid and review Show on Shop/Archive Pages and its position. Save, then check your shop and category pages. A custom product template may need separate placement if it does not render the normal WooCommerce hooks.
For custom placement, the button shortcode can target a specific product:
[swift_commerce_wishlist_button product_id="123"]Replace 123 with the real product ID. Do not paste that example unchanged into a shared template for every product, or every button will point to product 123. For a normal product page, start with the built-in position control instead.
5. Give customers a link back to the wishlist
Add the published Wishlist page to a sensible place in your navigation. With a block theme, edit the appropriate Navigation block in the Site Editor and add the page link. With a classic theme, use the theme’s menu settings.
Then follow the link as a customer. It should open the page you selected in Swift Commerce, not an older page left behind by another plugin. A save button is much less useful if customers cannot find their saved items again.
6. Test saving, removing and purchasing
- Open a product as a logged-out visitor, if guest wishlists are enabled.
- Click Add to wishlist and confirm the state changes or a notification appears.
- Open the Wishlist page and check the saved product.
- Remove the item and confirm it disappears.
- Save it again and use its purchase action. If the product needs options or a variation, complete that selection on its product page.
- Check whether Remove After Adding to Cart behaves as configured.
- Repeat while signed into a test customer account.
- Check the product button and Wishlist page on mobile.
If the page is empty, confirm you are using the same browser and account that saved the item. Also check guest access, the selected page and the shortcode before changing the design. Personalized wishlist pages should not be served as one shared cached page to every visitor; review your cache setup if different customers see the same stale contents.
What can you add with Pro?
Pro includes multiple named wishlists and privacy controls, with additional email options such as on-sale and back-in-stock notifications. These are separate from simply saving an item. Configure and test them intentionally rather than assuming the basic wishlist will send reminders automatically.
For supported wishlist notifications, the built-in Email Customizer lets you edit their content and shared design. The Wishlist documentation covers those options.
Frequently asked questions
Is a wishlist the same as a saved cart?
No. A wishlist is a list of products someone wants to keep. It does not reserve stock, lock a price or complete checkout. Check the current product details when purchasing.
Can guests use it without an account?
Yes, if Allow Guest Wishlists is enabled. Guest storage depends on the browser, so do not describe it as automatically synchronized across devices.
Do customers need Pro to save a product?
No. The basic wishlist is available in Free. Pro is for additional capabilities such as multiple wishlists, privacy options and supported reminder emails.
Check the Swift Commerce listing on WordPress.org for Free installation requirements and downloads.