


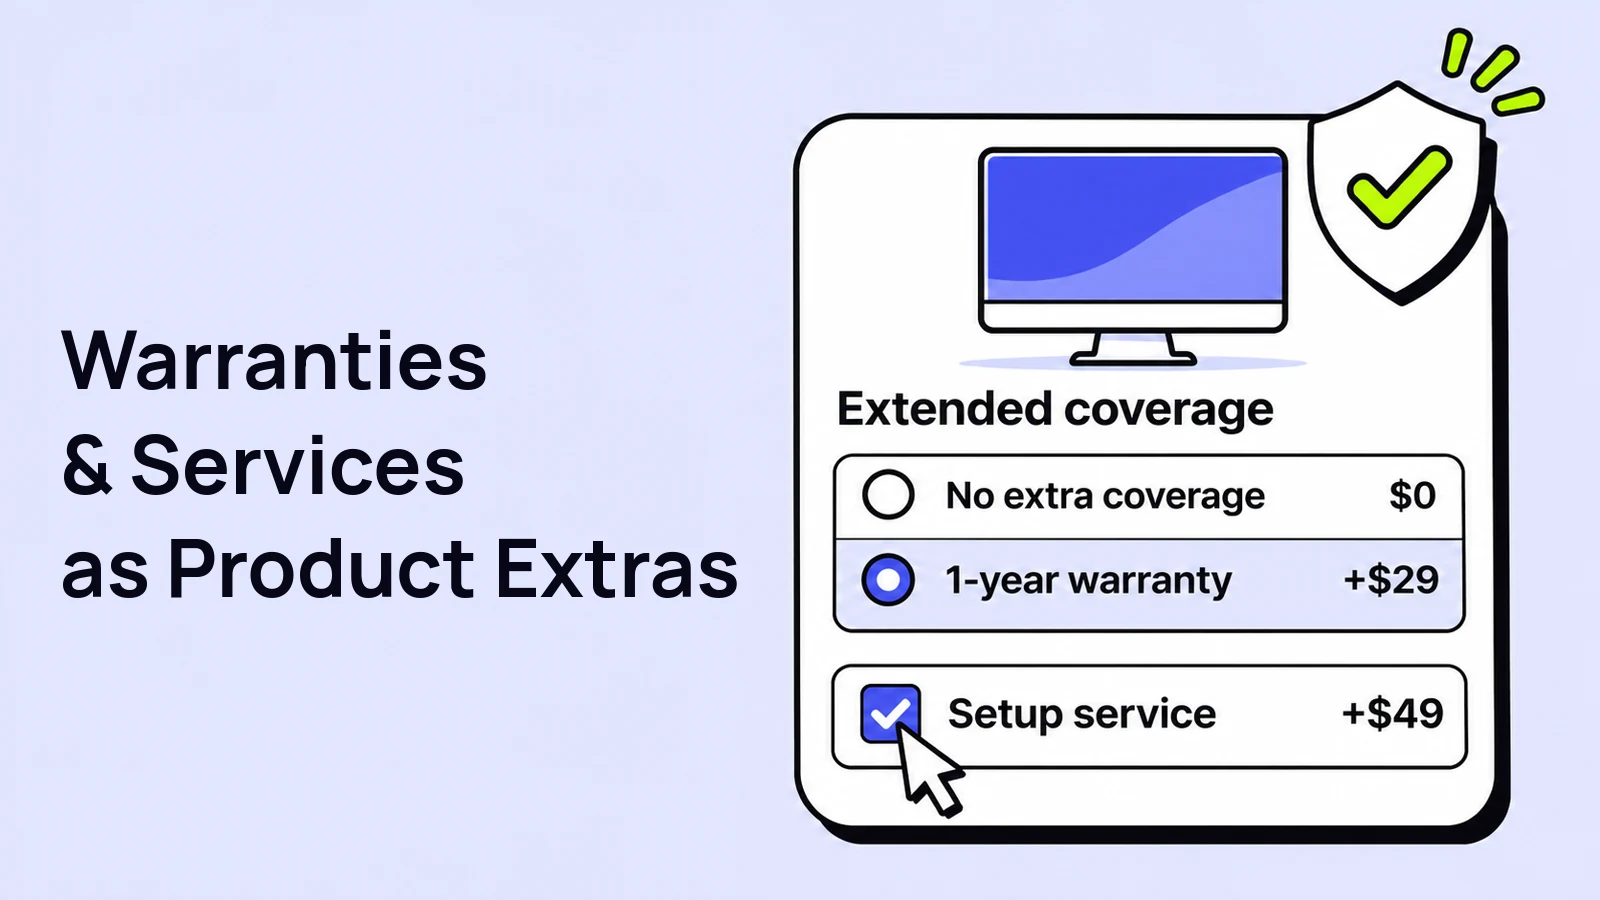
A customer buying a monitor might also want extended coverage or help setting it up. Those extras belong next to the purchase decision, not on a separate page the customer has to find.
This guide shows you how to sell warranties and services as WooCommerce product extras using Swift Commerce’s Product Addons feature. We will add a choice of warranty options and an optional setup service, give each a price, and check how the selections appear in the cart and order. The radio buttons, checkboxes, and pricing options used here are available in Swift Commerce Free.
An add-on is a paid selection attached to the main product. It is not a separate WooCommerce product with its own SKU or stock. That makes it useful for extras such as setup, assembly, and extended service plans, but it does not create a booking calendar or warranty-claims system.
Plan WooCommerce product extras before editing fields
We will use a monitor with a base price of $199 and these example options:
| Extra | Customer choice | Example price |
|---|---|---|
| Extended coverage | No additional warranty | $0 |
| Extended coverage | 1-year extended warranty | $29 per monitor |
| Extended coverage | 2-year extended warranty | $49 per monitor |
| Setup service | Add setup service | $49 once for this product line |
Only offer coverage or a service you can actually provide. Explain what it includes, when it starts, any exclusions, and how the customer requests help. The prices and warranty periods in this tutorial are examples, not suggested legal terms.
Make the paid options optional, and give the customer a clear way to decline. Do not use “No additional warranty” to suggest that a customer loses any standard coverage or statutory rights by declining an extra.
1. Enable Product Addons
- Make sure WooCommerce and Swift Commerce are installed and active. If needed, install Swift Commerce from Plugins → Add New Plugin.
- Open Swift Commerce → Products → Product Addons.
- Turn on the feature using the switch in the page header.
- Under Settings, set Addon Position to Before Add to Cart Button so shoppers see the extras before adding the product.
- Enable Show Prices in Labels and Live Price Updates to make the extra cost visible.
- Keep Show in Cart enabled so the selected extras appear with the cart item.
- Click Save Changes.
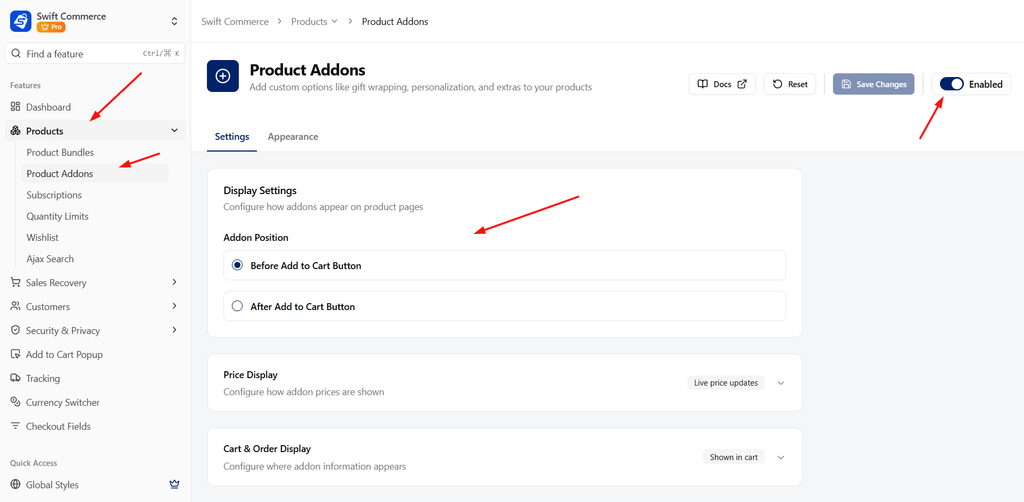
Those are feature-wide display settings. You will add the actual warranty and service options on each product.
2. Open the product’s Add-ons tab
- Go to Products → All Products and edit the monitor.
- Scroll to the Product data panel in the WooCommerce product editor.
- Open Add-ons. The panel is headed Product Add-ons by Swift Commerce.
- Use the Add field… dropdown to choose the type of extra you want to add.
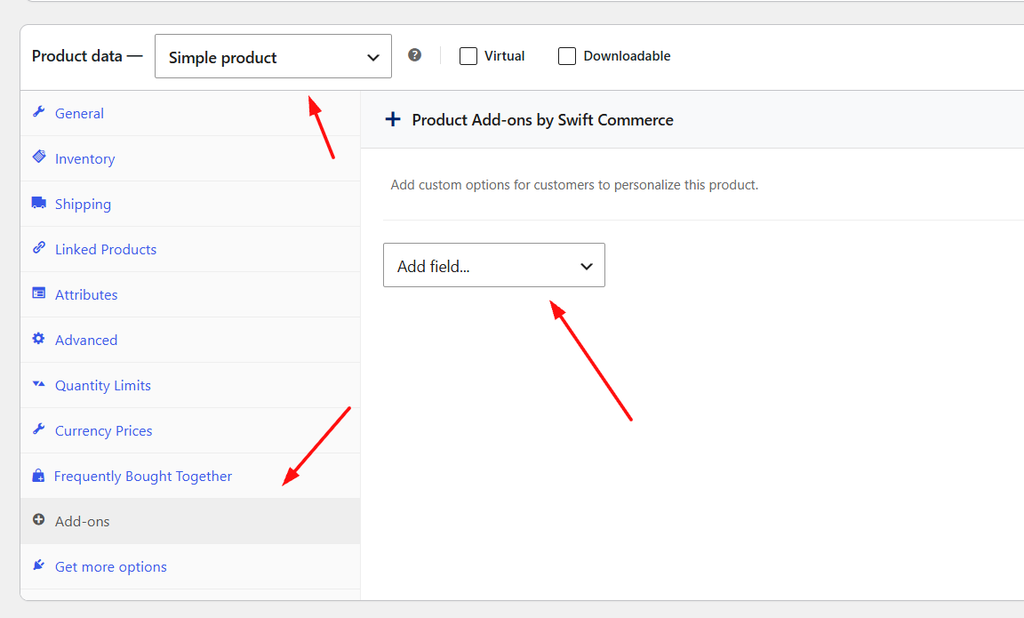
If Add-ons is missing, check that Product Addons is enabled and saved in Swift Commerce, then reload the editor. These instructions use the product editor with the Product data panel.
3. Add a warranty choice with radio buttons
Radio buttons work well here because a customer should choose one warranty option, not buy both warranty lengths for the same monitor.
- Choose Radio Buttons from Add field….
- Set Title to Extended coverage.
- Use Description to summarize the coverage and tell customers where to read the full terms.
- Enable Required field if you want every shopper to make an explicit choice.
- Edit the first option row to create No additional warranty. Set its price to 0.
- Click + Add Option and add 1-year extended warranty with a price of 29.
- Add another option named 2-year extended warranty with a price of 49.
- For the two paid warranty options, choose Qty in the option’s pricing dropdown so the extra applies to each unit purchased.
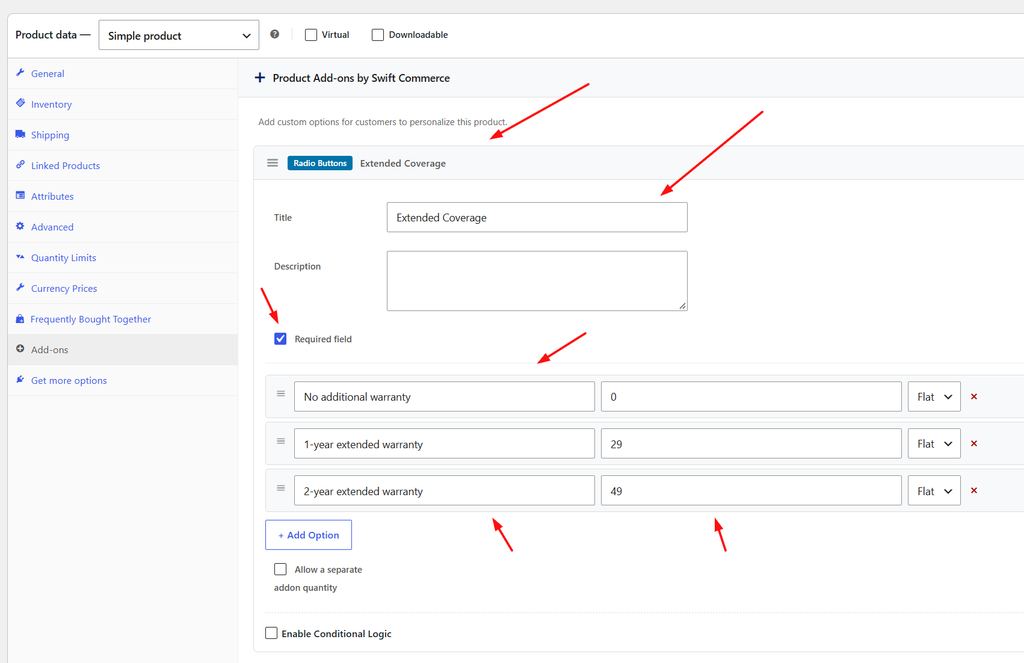
The Required field setting requires a choice, not a paid warranty. The zero-price option lets the customer decline additional coverage and still buy the product.
Enter amounts without a currency symbol. Swift Commerce uses your store’s currency. Do not type “+$29” into the option name just to display the price; use the Price field and Show Prices in Labels setting.
A dropdown can also work if you prefer a more compact layout. Use either radio buttons or a dropdown for mutually exclusive choices. Checkboxes would allow more than one warranty option to be selected.
4. Add an optional setup service
- Choose Checkbox from Add field… to create a separate field.
- Set Title to Setup service.
- Describe what the service includes and how it will be arranged. For example: “Remote setup assistance for the monitors in this order. We will contact you after purchase to arrange the session.” Only use that wording if it matches your service.
- Leave Required field off so the product can be bought without the service.
- Give the checkbox option the label Add setup service.
- Enter a price of 49.
- Choose Flat for a one-time charge on this cart line.
- Click Update to save the product, or save it as a draft if it is not ready to sell.
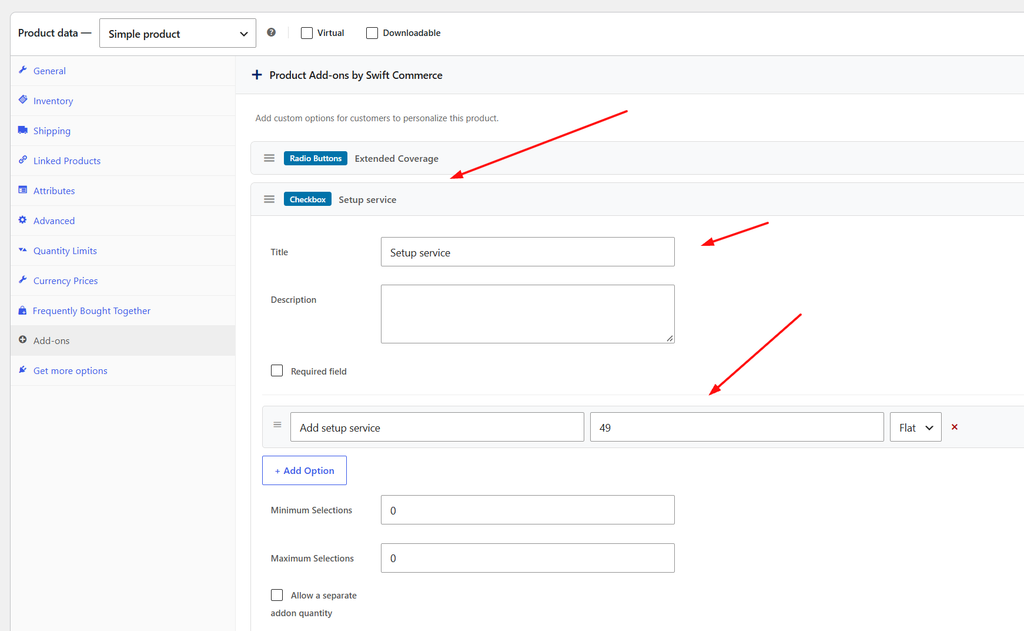
Keep the service checkbox unselected when testing a fresh product page. The customer should actively choose the paid service.
Choose the right pricing type
This is the part worth checking carefully. A warranty covering each monitor should normally follow the number of monitors. A single setup session might not.
| Option pricing label | How the charge works | Example |
|---|---|---|
| Flat | One fixed add-on charge for the cart line, even when its product quantity increases. | $49 for one setup session on that line. |
| Qty | The add-on price applies to each unit of the main product. | $29 warranty on each monitor: $58 for two. |
| % | A percentage of the product’s base unit price, which scales with product quantity. | 10% of a $199 monitor is $19.90 per unit. |
The option rows use the shorter labels Flat, Qty, and %. Elsewhere in the add-on editor, the corresponding pricing names are Flat Fee, Quantity Based, and Percentage.
A flat fee is not a single fee across the entire order. If a customer has separate configured product lines, a flat extra can apply to each selected line. If you intend to charge once across the whole order regardless of its contents, do not describe a product-level flat extra as doing that.
For our example, one monitor with the 1-year warranty and setup service totals $277 before any additional shipping or tax: $199 + $29 + $49. Two monitors on the same configured line total $505: $398 for the monitors, $58 for the warranties, and $49 for setup.
5. Check the product page and cart
Open the product in a private browser window and test each choice:
- Choose No additional warranty and leave setup unchecked. The extras should add $0.
- Choose the 1-year warranty. One monitor should gain a $29 extra charge.
- Choose the 2-year warranty instead. It should replace the first choice, not add both warranty prices.
- Tick setup and check that its $49 is included.
- If the warranty field is required, try adding the product without choosing any warranty option. You should be asked to choose.
- Add the configured product to the cart. Check that the option names appear under the correct product.
- Increase the cart quantity to 2 and confirm the per-unit warranty increases while the flat setup fee stays at $49 on that line.
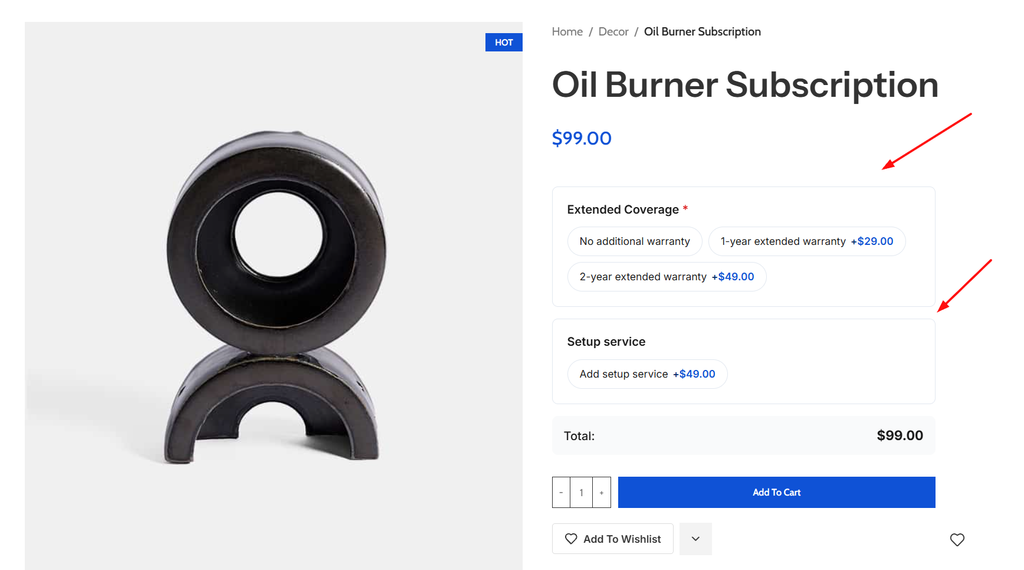
Refresh the cart and check the totals again. Also test the same product with different extra selections, because different configurations may appear as separate cart lines.
The examples above isolate the product and add-on amounts. Review your actual tax, shipping, sale-price, and coupon setup before deciding what final total customers should see. Product extras are not separate products with an independent tax class.
6. Check a test order and your fulfillment process
- Use your gateway’s sandbox or test mode to place an order with the warranty and setup service selected.
- Open the order under WooCommerce → Orders.
- Check the selected add-on details on the correct order item and confirm the charged total.
- Review the order confirmation and any customer-facing order details your store uses.
- Make sure the person arranging the service or recording warranty coverage can find the selections.
Collecting payment is only one part of selling a service. Decide who contacts the customer, where you record the coverage dates, and how you handle a request for help. Product Addons records the selection; it does not perform those tasks for you.
When Pro options are useful
The basic warranty and service setup above does not require Pro. Swift Commerce Pro adds options such as conditional field visibility, date/time fields, protected file uploads, and separate add-on quantity controls.
For example, conditional visibility can reveal a follow-up field only after a customer chooses a relevant extra. A date/time field can collect a preferred appointment time, but collecting a preference is not the same as reserving an available slot in a booking system.
Use the Product Addons documentation when you are ready to configure those advanced options. Start with the choices you can fulfill reliably rather than adding every available field.
Frequently asked questions
Can customers buy a warranty without buying the product?
Not through this setup. The warranty is an add-on attached to the product. If it must be sold independently, create a separate WooCommerce product and plan how that purchase will be linked to the item it covers.
Should I use a checkbox or radio buttons?
Use radio buttons or a dropdown when only one option should be selected, such as a warranty length. Use a checkbox for an independent optional extra, such as setup or assembly.
Why is my service fee increasing with product quantity?
Check the option’s pricing dropdown. Qty charges per unit of the main product. Use Flat if the service should have one fixed charge for that cart line, then test again with two units.
Can I apply this to every product at once?
This walkthrough configures add-ons on an individual product. Do not assume it creates a reusable global field group. Configure and verify the extras on each product that should offer them.
Once the prices, order details, and fulfillment process are clear, you have a product page where customers can choose the extra help or coverage they need without a separate checkout journey.
Check the Swift Commerce listing on WordPress.org for Free installation requirements and downloads.