


An out-of-stock product does not have to be a dead end. Give shoppers a way to leave their email address, then notify them when that product becomes available again.
This guide shows you how to add back-in-stock notifications to WooCommerce with Swift Commerce’s Back In Stock feature. You will enable the signup form, configure confirmation and stock rules, customize the emails and run a complete test with a product and an inbox you control.
The basic signup and restock-notification workflow is available in Swift Commerce Free. Pro adds controls such as per-product subscription limits, CAPTCHA protection and analytics. We will keep the initial setup focused on getting one reliable alert working.
In this guide
Before you begin
- Make sure WooCommerce and Swift Commerce are installed and active.
- Use a staging site for the first test, especially if your live store already has stock-alert subscribers.
- Choose a published simple product you can safely change to out of stock and restock.
- Have an email address you can access for the signup and confirmation test.
- Check that WordPress can send email through your site’s configured mail service.
A stock alert is not a reservation or a preorder. It tells the customer that stock has returned; it does not hold an item for them or take a payment.
1. Keep the out-of-stock product visible
- Open WooCommerce → Settings → Products → Inventory.
- Find Out of stock visibility.
- If you want shoppers to find sold-out products and join their waitlists, leave Hide out of stock items from the catalog unchecked.
- Save your changes.
WooCommerce documents this catalog setting in its Products settings guide. It is separate from the setting that decides whether the stock-alert form should be shown.
Also check the test product’s own publication and catalog visibility. If shoppers cannot reach a product or select a sold-out variation, they cannot use its signup form.
2. Enable Back In Stock in Swift Commerce
- Open Swift Commerce → Sales Recovery → Back In Stock. You can also find it through the dashboard’s feature search.
- Enable the feature with its main toggle.
- In the General tab, turn on Show on out of stock products.
- Leave Show on backorder products off for this first test.
- Click the page-level Save Changes.
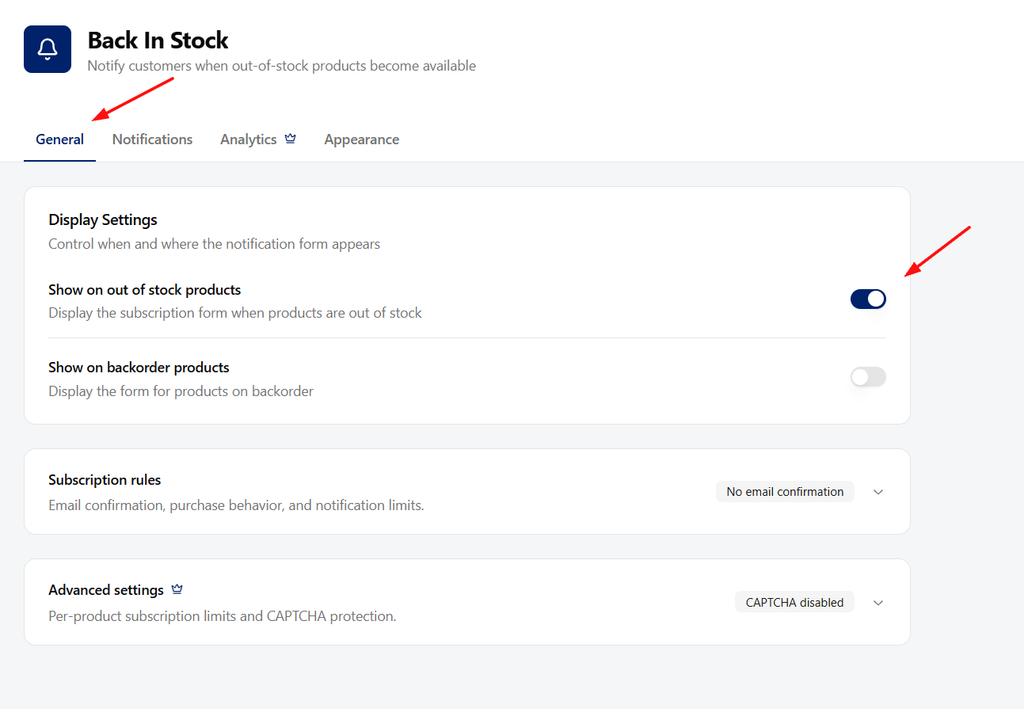
Backorders and out-of-stock products are different situations. A backorder lets a shopper place an order while stock is unavailable. A stock-alert signup asks to hear when it returns. You can configure the backorder display separately if your store needs both.
3. Choose the subscription rules
Still in General, expand Subscription rules. For a straightforward first setup, use the following controls.
- Allow guest subscriptions: turn this on if shoppers should be able to request an alert without creating or signing in to an account.
- Require email confirmation: turn this on to ask the subscriber to confirm ownership of their email address before it joins the active waitlist.
- Auto-remove on purchase: enable this if the customer’s subscription should be removed when they purchase that product.
- Subscription limit per user: set the maximum number of products someone can subscribe to. Use 0 for unlimited.
- Minimum stock to notify: use 1 for the first test. If you later set a higher threshold, a quantity-managed product needs to reach it before notifications can be processed.
Save the settings. With confirmation enabled, submitting an email address is not the final step. The customer needs to follow the confirmation link before becoming eligible for the restock notification.
A stock threshold helps you avoid announcing a very small restock to a large waitlist. It does not allocate one item per subscriber. For example, setting the minimum to five does not promise every person on a ten-person waitlist a product.
4. Check the form’s appearance
- Open the Appearance tab.
- Choose a design preset available in your plan.
- Review the form in the live preview, including its phone-sized view.
- Use the available design controls to match your store, then save.
Keep the form readable rather than turning it into another promotional banner. The customer needs to understand which product the request is for, where to enter their email address and what happens after they submit it.
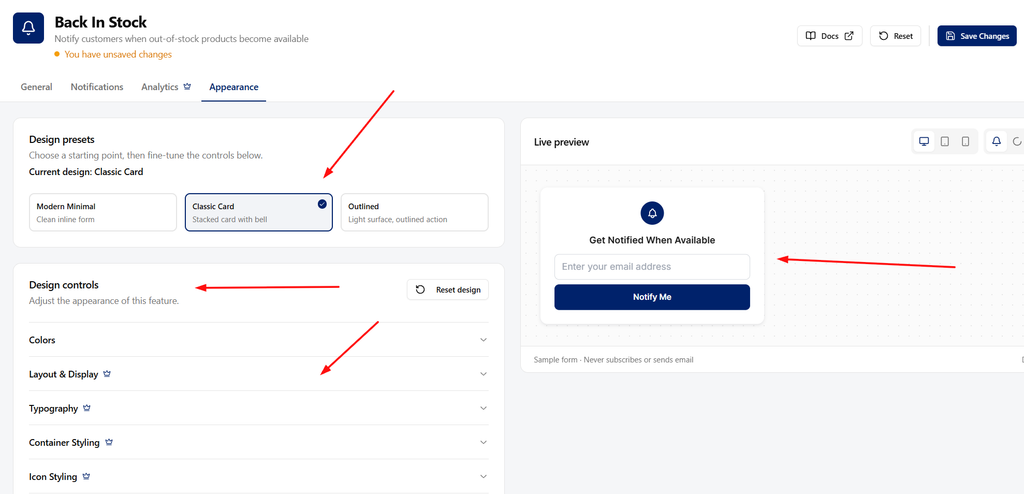
Pro unlocks additional form-content and styling controls. You do not need to customize every label or color to run the basic stock-alert workflow.
5. Configure the sender and customize both emails
- Open Notifications → Email Settings.
- Under Email Sender, check From name and From email. Use a sender identity configured with your site’s mail service.
- Under Email Templates, find Confirmation Email and click Customize Email.
- Review its subject, heading and body in the built-in Email Customizer. Preserve the confirmation action so the recipient can complete the signup.
- Save the email changes and return to the Back In Stock settings.
- Open Notification Email → Customize Email. Review the product details and the link that takes the shopper back to the product.
- Save the email changes, then save the feature page.
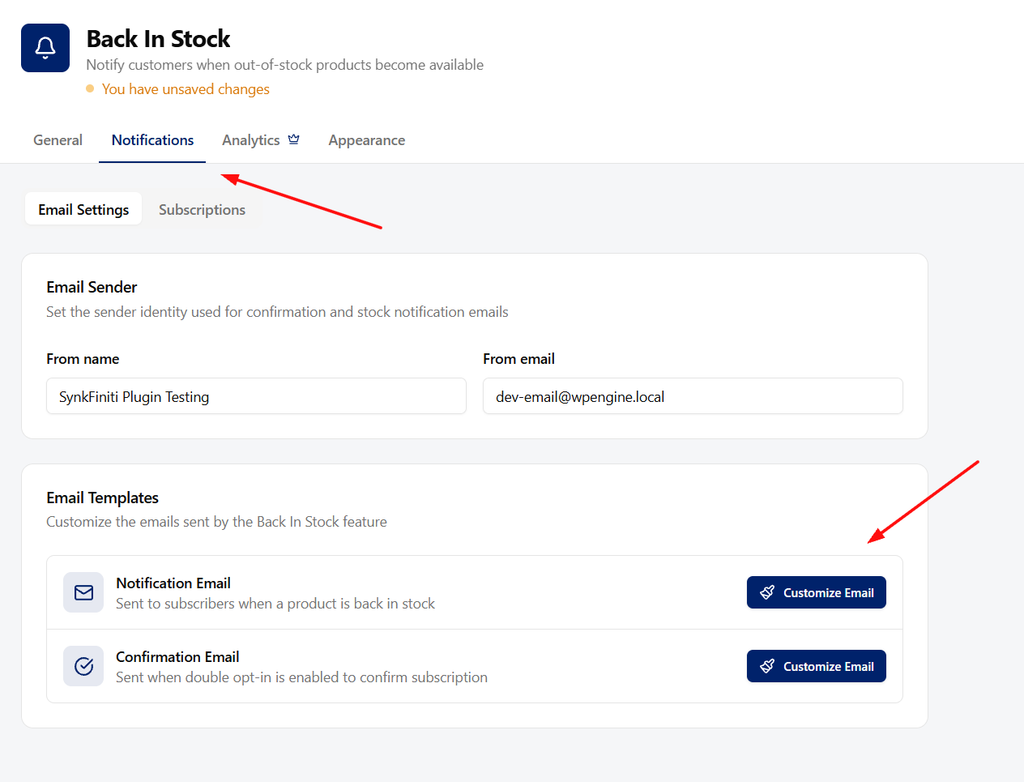
The confirmation email and notification email do different jobs. The first confirms the request. The second announces that the product is available again. Do not replace the confirmation message with a generic welcome email.
Use the customizer’s available placeholders rather than typing a different product name into every template. For example, {product_name} inserts the relevant product name. Preview both desktop and mobile layouts, and use a test email to inspect the design if needed.
The built-in Email Customizer is shared across supported Swift Commerce emails. Shared branding changes can affect other email types, so check what you are changing before saving a site-wide logo or color.
6. Subscribe to an out-of-stock test product
- Open your test product under Products → All Products.
- In Product data → Inventory, make it genuinely out of stock. If you manage stock quantity, set the quantity to zero and do not allow backorders for this test. Otherwise, set the stock status to Out of stock.
- Update the product.
- Open its product page in a private browser window.
- Enter your test email address in the stock-notification form and submit it.
- If email confirmation is enabled, open the confirmation email and follow its link.
- Return to Swift Commerce → Back In Stock → Notifications → Subscriptions and find the request.
Check the product and email address on that request. Seeing a form-success message is not enough; you want to know that the correct request was recorded and, where required, confirmed.
If you use variable products, repeat the test with a specific sold-out variation after the simple-product test works. Select the relevant size, color or other options before signing up, and restock that same variation. Do not assume a request for one variation means a request for every variation.
7. Restock the product and verify the notification
- Return to the test product’s Inventory settings.
- If stock quantity is managed, increase it to a positive number that meets Minimum stock to notify. Otherwise, change the stock status to In stock.
- Update the product.
- Allow the site’s scheduled notification processing to run.
- Check the inbox and spam folder for the restock email.
- Open the email’s product link and confirm that it leads to the correct, purchasable product or variation.
Swift Commerce queues notification work rather than sending every email during the product-save request. That means saving a restock is not a guarantee that all messages will arrive immediately. WordPress scheduled tasks and your mail service both need to be working.
If the email does not arrive, check confirmation first, then the stock status and threshold. After that, review scheduled-task and mail-delivery errors with your host or email provider. A successful WordPress mail handoff is not proof that a message reached the recipient’s inbox.
Only repeat the restock test with a product whose waitlist you control. Changing stock on a live product with real subscribers can trigger real notifications.
What can you add with Pro?
Once the basic flow is working, Pro gives you more control over high-demand products and form abuse.
- Subscription limit per product: cap the number of subscriptions accepted for a product.
- CAPTCHA protection: enable CAPTCHA on the subscribe form after configuring the provider in the separate reCAPTCHA feature.
- Analytics: review stock-alert activity and notification performance for the selected period.
- Advanced appearance controls: adjust additional form content and styling.
Those are optional improvements, not a substitute for testing the confirmation and restock emails. The Back In Stock documentation covers the wider settings.
Questions about WooCommerce back-in-stock notifications
Is this the same as WooCommerce’s low-stock email?
No. Low-stock and out-of-stock administration emails help you manage inventory. This workflow lets a shopper request a customer-facing email when a particular product is available again.
Why is the signup form missing?
Check that the feature is enabled, the product is actually out of stock and Show on out of stock products is on. Confirm the product is visible. If guests are not allowed to subscribe, test while signed in. For a custom product-page template, check the supported Back In Stock block or shortcode placement in the documentation instead of assuming the template includes the usual WooCommerce hooks.
Does the notification form add people to my newsletter?
No. A request for a product-restock notification is not automatically a newsletter subscription. Do not treat the stock-alert list as a general marketing list.
Can I collect requests before I know the restock date?
Yes, but do not promise a date you cannot confirm. The notification follows the product becoming available and meeting your configured stock rules, not an estimated date entered in the form.
When your controlled test works from signup to purchase link, you have the important part in place. Make the same checked configuration live, and keep an eye on email delivery when you run your first real restock.